Find my kits here

Tasha's Playground Fan Page
Find me on Facebook
My Personal CT


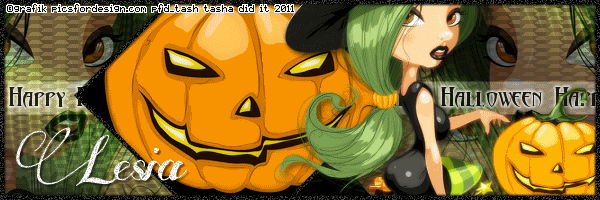
Thursday, September 29, 2011

Supplies-
Kit- "Flirting With Fall" a gorgeous kit by DarkMoon's Dream which you can purchase from Lollipops N Gumdrops here
Tube- I'm used a beautiful tube by Keith Garvey, which is available for purchase from PTE with a valid license here
Mask- WSL_Mask61 here
Font of choice
Here we go :)
Open a new canvas 650x650
open window and c/p towards bottom of canvas
using your magic wand tool, click inside each frame
selections>modify>expand by 5
c/p pp01 as a new layer under window
selections>invert
on paper layer, hit delete, deselect
c/p flowers and place as a new layer at the top of the window
c/p leaf03 and place in bottom right corner of window-duplicate & mirror
c/p berries and place in upper right corner of window-duplicate & mirror
c/p flowerpot and place on left side of window
c/p tube of choice and place in the middle of window
duplicate and apply gaussian at 2. change blend mode to Screen and opacity 60
duplicate and change blend mode to Overlay and opacity 80
drop shadow the bottom tube layer without the blur
c/p flower 3 and place in bottom corner of window-duplicate & mirror
c/p chestnuts, leaf02 duplicate & mirror
c/p flower 1, mushrooms, squirrel, acorns and basket and place on tag
crop and resize tag
sharpen and drop shadow elements
add copyright and license info
add name and any additional text
merge, save, enjoy :)
Thank you for trying out my tut! If you have any questions or would like to show me your results, feel free to email me: bananas_68@yahoo.com
Here are some extras I made using a kit called 'Elijah' by Wicked Princess Scraps. Just click it to view in full size, then right-click save :o) Please do not share, instead, direct people to my blog if they'd like to snag!


Sunday, September 25, 2011
Supplies-
Tube- I'm using a cute little tube by Grafik available for purchase at PFD
Plug Ins- Xero>Porcelain, dsb flux>spider web, Filter Factory B>Cut Glass
Fonts- Abaddon and Some Weatz Swashes, both FTU
Animation Shop
Here we go :)
Create a new canvas whatever size you like your banners. I did mine 600x200
Flood fill with color or gradient of choice that matches your tube
I did a gradient, angle 25, repeats 4
duplicate this layer
on top layer, apply Filter Factory B>Cut Glass:
Number of 44, Transparency of 25
change blend mode to Dodge
Add close up of tube, duplicate and mirror
duplicate, reposition and mirror
repeat this until you've filled up the banner with close ups
merge tube layers layers
change blend mode to screen, opacity 40
Move this below your Cut Glass layer
Activate your preset tool, rectangle
change foreground color to null, background white
Draw out a rectangle the width of your banner
it's ok if it goes over the edges, we'll crop in a sec
convert to raster layer and change blend mode to soft light
Activate your text tool and using the Abaddon font, type out Happy Halloween
Convert to raster layer and apply a fat, white gradient glow-width 3
change blend mode to 82
Activate your preset tool, square, line width 4
change foreground color to black, background null
Draw out a square inside your banner, convert to raster layer
Image>rotate>free rotate 45 degrees
Adjust>add noise 60%
Using your magic wand tool, click inside your frame
selections>modify>expand by 3
add new raster layer below frame and flood fill with color of choice
c/p tube close up as a new layer below frame
selections>invert
hit delete on keyboard, deselect
Apply Xero>Porcelain to tube close up:
Add main tube of choice
Duplicate
On top layer, adjust>blur>gaussian blur 2
change blend mode to Hard Light, opacity 50
Duplicate, change blend mode to Screen, opacity 42
apply drop shadow to bottom tube layer
Crop your banner
activate bottom layer
selections>select all>float>defloat
selections>modify>select selection borders:
Inside, width 4
add new raster layer, flood fill with color of choice
add noise at 60%, move layer to the top
Apply drop shadow (1, 1, 50, 2 then -1, -1, 50, 2)
add your license and copyright info
add name and any additional text
if you aren't going to animate, go ahead and save :)
To animate:
Remember that first layer you duplicated? Activate it.
It should be your very bottom layer.
Apply DSB Flux>Spider Web:

Edit>copy merged
Over to Animation shop and paste as a new animation
Head back to PSP and hit Undo
Reapply Spider Webs, but increase the Rays to 20
Edit>copy merged
Over to AS and paste after current frame
Repeat the steps above, increasing the Rays each time by 5
I did it until I got to 35, but you can do as little or as much as ya want!
In AS, select all frames
change frame properties to 15
Save as GIF, and enjoy :)
Thank you for trying my tut. If you have any questions or would like to show me your results, feel free to email me: bananas_68@yahoo.com


Supplies:
Kit- "PussyCat Doll" a collab kit by Sky Scraps and Addictive Pleasures. This awesome kit is available at Scraps and the City here
Tube- Elias Chatzoudis, available for purchase at PTE with a valid license
Mask- AR315_Mask88 here
Font- Riddle, a FTU font
Here we go :)
Open a new canvas 650x650
c/p paper p7 as a new layer
layers>new mask layer>from image
apply mask, merge group
c/p f4 onto canvas and resize
using your magic wand tool, click inside each frame
selections>modify>expand by 5
selections>invert
resize and c/p paper p5 as a new layer under frame
hit delete on keyboard
deselect
I added a glow to the frame to make it pop
Add tube of choice to middle frame
duplicate and move one copy below the frame layer
using your eraser tool, erase bottom of both tube layers
so it looks like she's coming out the frame
drop shadow the bottom tube layer
c/p and resize stars above mask layer. duplicate and mirror
c/p e47 as a new layer above stars, resize
c/p feathers, duplicate and mirror
c/p e23, lights and glass elements, arrange on tag
c/p screw, duplicate and mirror
c/p lips, resize and place on tube
c/p ticket, image>rotate>free rotate to right 30 degrees
crop and resize your tag
add license and copyright info
sharpen and drop shadow elements
add name and any text
merge, save enjoy ;)
Thank you for trying my tut! If you have any questions, or would like to show me your results, please email me: bananas_68@yahoo.com
Saturday, September 24, 2011
I am absolutely honored and pleased to announce that I am now a CT member for Pics For Design!!! I love this tube store and am thrilled to have been chosen as their first CT member! Make sure to visit the store often and see what each artist has to offer :)

Thursday, September 22, 2011

Supplies-
Kit & Mask- You can grab both of these from Laurie Made Me Scraps here. It's the Halloween kit and lrmask162
Tube- I'm using a multi-layered tube by Sky Scraps, available at Scraps and the City here. You must have a valid license to use this tube
Font- Abaddon a FTU font here
Plug In- DSB Flux>Bright Noise
Animation Shop
Here we go :)
Open a new canvas 650x650
flood fill white
c/p paper 40 onto canvas
layers>new mask layer>from image
If you're using the same mask, invert mask data
apply mask, merge group
c/p element 84
activate your magic wand tool
click inside your frame
selections>modify>expand by 5
selections>invert
c/p paper 30 under frame
hit delete, deselect
add these elements from the kit:
163
164
121
162
79
118
57
add tube of choice and drop shadow
crop and resize tag
add copyright and license info
sharpen and drop shadow elements
If you aren't going to animate, delete white background
merge and save as PNG
To animate:
merge visible (with background)
Use your magic wand tool and select the part you will animate
DSB Flux>Bright Noise: 50/Mix
deselect, copy
In AS- paste as a new animation
Back to PSP
Hit undo a couple of times until you're back to the selection with no noise in it
Repeat DSB Flux, but hit Mix before you apply it
deselect, copy
In AS- paste after current frame
Back to PSP
Repeat above steps one more time
review animation, if happy save as GIF!
Thank you for trying my tut. If you have any questions or would like to show me your results, please email me: bananas_68@yahoo.com
Leah from Amy & Leah's Gimptastic Tuts worked with my G Gurl Swag kit, and I just love her results!! Thank you so much for using my kit Leah :) You can find the tut here.

Amy made this great tag using my G Gurl Swag kit. Thanks for working with my kit girl, you rocked it!! Check out the tut here.

Wednesday, September 21, 2011
I was lucky enough to get to work with the awesome chicks at Amy & Leah's GimptasticTuts on some collab temps!!! They were a lot of fun to put together, and I hope we can do more in the future :o) Check out their blog here for other great freebies and tuts! Here are our temps, love to see anything you make with them!

You can download them here
Monday, September 19, 2011

Supplies:
Kit- "In Awe of Autumn" which is a gorgeous kit by Jo. Visit her at A Taggers Scrap here to find out where you can purchase it
Tube- Anna Marine, available at CDO with a valid license
Mask- WSL_Mask128 here
Font of choice
Open a new canvas 600x600
c/p paper 1 onto canvas
layers>new mask layer>from image
apply mask, merge group
c/p deco 1 above mask
duplicate, mirror, flip
c/p butterflies, resize and place towards top of tag
c/p frame 6, place in center of mask
c/p frame 8 and place on top of frame 6
using your magic wand tool and click inside frame 8
selections>modify>expand by 5
selections>invert
resize and c/p paper 2 under frame
hit delete on keyboard, deselect
add main tube of choice and drop shadow
decorate your tag with elements
I used:
butterflies
fallen leaves- duplicate, mirror
deco 4
tree
bird
mushrooms-duplicate, resize, reposition
bow 4
chipmunk
log
crop and resize tag
add license and copyright info
sharpen and drop shadow elements
add name and any text
merge, save, enjoy :)
Thank you for trying my tut! If you have any questions or would like to show me your results, please email me: bananas_68@yahoo.com
Shani did some awesome snags using my new kit G Gurl Swag!! There are 3 different ones on her blog, in 2 posts here and here.
I want to give Shani a HUUUGGGEE thank you, for helping me get started with kit making. She sent me links to PSP groups and all kinds of blogs that have CU freebies. She's been there to answer any questions and help teach me about staying copyright compliant while creating my kits. And on top of it all, she was my first real customer, even though I'm sure she knows I would have gladly given her the kit for free. It's hard to find people this kind in real life, let alone an online community..and I just can't thank her enough!!
Ok, enough of the mushy stuff, lol. Now go snag those extras!!!


Sunday, September 18, 2011

Supplies-
Kit- You'll want an autumn kit, and this one called "Autumn Retreat" by annaica is perfect! Visit her blog here for info on where you can purchase this stunning kit.
Tube- I'm using the amazing artwork of star up and comer FourXsDesigns, available for purchase at PTE with a valid license
Template- Temp67-Leah by Leah here
Mask of choice
Font of choice
Plug Ins- EC4>Gradient Glow
Here we go :)
Open your template, Ctrl+D, close out original
delete layers- credit, stars 1, stars 2, frame
Replace layers from the template with papers from the kit:
selections>select all>float>defloat
resize and c/p paper as a new layer on canvas
selections>invert
hit delete on keyboard, deselect
delete original template layer
I used:
square 3- paper 7
square 2- paper 7
circle 3- paper 9
circle 2- paper 3
circle 1- paper 12
square 1- paper 14
rect 2- paper 10
rect 1- paper 10
On each layer I also added a fat gradient glow, width 5:

Place your tube of choice in the middle of the template
Duplicate, on top layer apply gaussian blur of 2
change blend mode of top tube to Soft Light, opacity 62
Duplicate, and change that blend mode to Screen, opacity 42
Now you're going to add elements from the kit to your tag
I usually don't add many, because I hate a cluttered tag...
but in this case more is better :)
You can use my tag for reference, may have to rotate some things
I used:
47
25
14
5
22-duplicate, mirror
9
30-duplicate, mirror
28
31
54- duplicate, resize, mirror
1
51- duplicate, mirror
3
10
2
40
35
15
51
52
*whew*
Now crop and resize your tag
add copyright and license info
sharpen and drop shadow your elements
add name and any text
merge, save, enjoy :)
Thank you for trying my tut! If you have any questions, or would like to show me your results, please email me: bananas_68@yahoo.com
Saturday, September 17, 2011
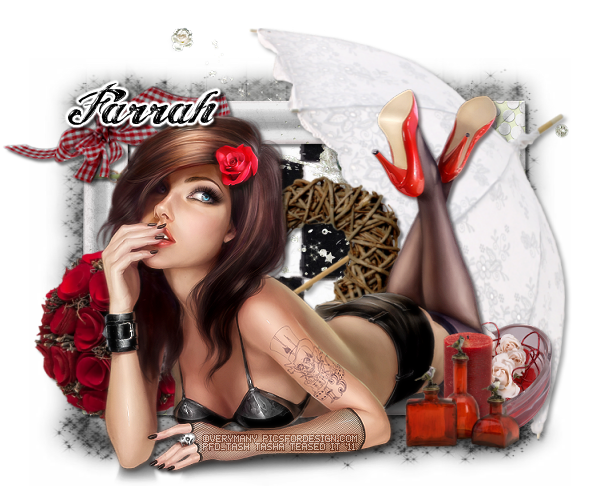
Supplies-
Kit- "Roses Are Red" by Farrahs Designer Scraps here
Tube- I'm using the work of VeryMany available for purchase at PFD with a valid license
Mask- RR_Mask1 here
Font of choice
Here we go :) This will be an easy one :)
c/p paper of choice onto canvas
layers>new mask layer>from image
apply mask, merge group
add frame 2, resize
using your magic wand tool, click inside the frame
selections>modify>expand by 5
selections>invert
resize, c/p paper 4 as a new layer under frame
hit delete on keyboard
deselect
drop shadow frame
add main tube of choice
duplicate
adjust>blur>gaussian blur of 2
change blend mode of top tube to soft light, opacity 36
duplicate, change blend mode to screen, opacity 50
drop shadow bottom tube layer
Now decorate your tag with elements
from bottom to top I used:
glitter
umbrella
wreath
flowers1
bow3
heart
candle
bottles
crop and resize your tag
add copyright and license info
add name and any text
merge, and save :)
Thank you for trying my tutorial. If you have any questions or would like to show me your results, please email me: bananas_68@yahoo.com
My first PTU kit is called G Gurl Swag, and is based on Garv's G Gurl! It can easily be used with other tubes though if you don't have that one :) The important thing here, is to buy it, lmao!! This kit is for Personal Use only. Please don't share it!!
You can find this kit at SATC

Thursday, September 15, 2011
I decided to join in on the Collab Temp challenge over at Creative Misfits..I got paired up with Linda, and had a blast!! You can download our templates at the Misfits blog, and I'd love to see anything made with them!!
Just click the preview to go to the blog and snag them :)

Sunday, September 11, 2011

Supplies:
Kit- "Gone Bad" by Chichi Designz availble at Twilight Scraps here
Tube- I'm using the work of Freya Langford-Sidebottom available at PSP Asylum here
Mask- Mask 412 from GiZZy here
Font- Vivaldi a FTU font here
Here we go :)
Open a new canvas 700x700
c/p paper 7 onto canvas
layers>new mask layer>from image
apply mask, merge group
add wall, resize
duplicate, flip and reposition
Now c/p frame 2 as a new layer
using your magic wand tool, click inside the frame
selections>modify>expand by 5
c/p paper 2 as a new layer under frame
selections>invert
hit delete on keyboard
add tube of choice, duplicate
change blend mode of top tube to screen, opacity 50
drop shadow bottom tube layer
Now decorate your tube with elements
I used:
curtain- duplicate, mirror
black rose- duplicate, mirror
smoke
spooky eye
tree
gargoyle
candle
candle 1
bress
book
skull- duplicate and resize a few times, play with rotation
lanterne
cup
Crop and resize your tag
sharpen and drop shadow elements
add license and copyright info
add name and any text
merge, save as PNG :)
Thank you for trying my tut. If you have any questions or would like to show me your results, please email me: bananas_68@yahoo.com
Subscribe to:
Posts
(Atom)
My Blinkies


I Get Creative For
