Find my kits here

Tasha's Playground Fan Page
Find me on Facebook
My Personal CT


Friday, November 30, 2012

A Very Merry Winter is a fun winter kit with a holiday twist! This taggers kit is versatile enough to compliment your Christmas tags, and keep being used when December ends :) The colors were picked in collaboration with Zlata M to match some layers from her new tube, Winter Fun. You can find her gorgeous tube at Pics For Design here. Visit any of my stores to pick up the kit..you can find them listed to the left :)

Wednesday, November 28, 2012

You can find this gorgeous, sexy Zlata tube at Pics For Design here. She comes with different layers for her hair highlight and you can use her with or without the trim around her dress. You must purchase this tube and have a valid PFD license to use it!
The kit I used is a fun one by Designs by Sarah called Caroling. You can find it at Pimp My Tags W/ Scraps here.
Below are some extras for you to snag. Just click to enlarge, and then right-click save to your computer. These are not to be altered (adding names, elements, etc) or resized. Thanks and enjoy!


Thursday, November 22, 2012

*click tag to view full size*
I paired this gorgeous tube by Alex Prihodko with an equally gorgeous kit by Soxsational Scraps called Winter Pixie.
Visit Soxie's blog here for a list of her stores where you can purchase this beautiful winter kit and to see her other wonderful goodies.
You can find the tube at PFD here, and it does come with multiple layers. You must purchase this tube and have a valid license to use it.
Tuesday, November 20, 2012

Supplies-
Kit- Forest Keepers, a gorgeous kit by Gimptastic Scraps here
Tube- Arthur Crowe which you can find here. You must purchase this tube and have a valid license to use it.
Font- The Daily Bread
Photoshop CS5
I'm on a Mac, so when I use Command you may need to use Ctrl
Here we go :)
Open a new canvas 600x225.
Place Paper 2 as the bottom layer and position how you like.
Create a corner border with some of the elements:
Place Grass above paper and position towards the left corner.
Place Branch 4 in bottom left corner.
Position Leaf 2 in the bottom left corner. Command+J to duplicate.
Edit>Transform>Flip Vertical. Place copy in upper left corner.
Place Leaf 3 centered above Leaf 2. Duplicate and flip as above.
Place Flower 4 in the middle of the border.
Close out the background paper layer by clicking the eye next to it.
Merge visible your other elements.
Add a drop shadow of choice. Duplicate border layer.
Edit>Transform>Flip Horizontal. Reposition to right corner.
Make background visible again.
Add Frame 5 above paper, position to the left. Duplicate and flip then place
copy to the right of canvas. Merge 2 frame layers together.
Place Paper 5 below frames. Using Magic Wand Tool (w), click inside each frame.
You may need to click around inbetween a few branches.
Select>Modify>Expand by 2. Select>Inverse. Hit Delete on paper layer. Deselect.
Add tube close ups below the frame layer. Right click and Create Clipping Mask to clip the
tubes to your paper. Change blend mode to Soft Light, Opacity 45%.
Duplicate. Change blend mode to Screen, Opacity 55%.
Add drop shadow of choice to frame layer.
Add main tube to center of canvas as top layer. Duplicate.
Filter>Blur>Gaussian blur 2px. Blend mode Screen, Opacity 60%.
Drop shadow bottom tube layer.
Create a new layer as the top layer.
Select>All. Select>Border 4px. Flood fill with color #64770b.
Duplicate layer. On top- Filter>Noise>Add Noise 40%, Uniform.
On bottom layer, add a 2px white stroke, outside.
Decorate with any remaining elements from the kit. I added a couple of butterflies.
Add artist copyright info and your license for the tube.
Add name and any additional text of choice.
Merge, save, enjoy :)
Thank you for trying my tut. If you have any questions or would like to show me your results, feel free to email me or find me on facebook!
Sunday, November 18, 2012

You can find this great, winter themed kit at any of my stores. It is tagger sized and has 73 unique elements and 10 beautiful papers. Enjoy!
Friday, November 16, 2012

Have you checked out this stunning tube by Misticheskaya at PFD? She comes with 5 vividly colored layers for loads of different ways to play. You can purchase this tube at Pics For Design here.
Thursday, November 15, 2012
I've decided to put all my kits on a BUY 1 GET 1 FREE sale at PicsForDesign!!!! This special will run until the end of November :o) And with PFD's system, you can buy 1 now, and then your freebie will be there until you use it..it doesn't expire with the sale..how awesome is that!!!! So click the ad below to head on over to PicsForDesign and shop, shop, shop!!!!

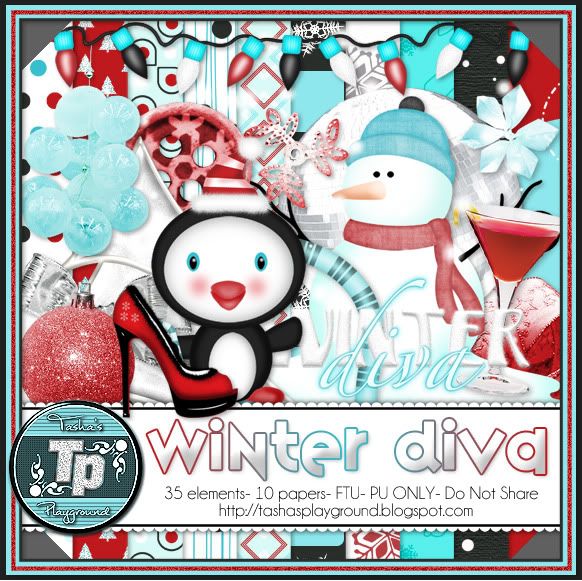
Amy, Leah and I came together to bring you all this great winter collab!! Winter Diva is a fun, snowy kit to add some sass to those winter tags! Free to use doesn't mean free to share, so please don't share this kit with others. Instead, just direct people to this post :o) You can snag my part of this amazing collab here or here. As always, if you make anything with this or any of my kits, I'd love to see it! Just email me at bananas_68@yahoo.com or check me out on facebook (page link on the left of blog).
**Updated with 2nd download link**
Stop by Amy & Leah's Gimptastic Tuts here to snatch up their parts. Don't forget to thank them for their awesomeness!!!!


Tuesday, November 13, 2012

Make those tags shimmer and shine with my newest kit, Winter Wonderland. This tagger sized kit has 67 elements and 10 papers, and is for personal use only. You can find this kit in all my stores listed to the left of my blog! Thanks, and happy tagging!!
Grab it as part of my fab winter bundle here.

Friday, November 9, 2012

In honor of November being Native American Heritage Month, I made one of my good friends, Sarah, a one of a kind tag!! I used her wonderful kit, All My Relations, for this banner. Visit Sarah's Tags N Things here for where you can purchase this kit and many others!
Tuesday, November 6, 2012

Supplies:
Kit- Turkey Day Protest by Gimptastic Scraps. Save the turkeys and visit here for where you can get this awesomely original kit!!
Tube- I'm using the work of Elias Chatzoudis. I purchased these tubes when he was at PTE, but you can now get them at his new store here. You must use a license with his work.
Mask-WSL_Mask 124 here
Font- Wish I Were Taller for the word art. Smiley Monster for the name.
Photoshop CS5
I'm on a Mac so when I use Command you may need to use Ctrl
Here we go :)
Open a new canvas 700x700
Place Frame 2 in center of canvas.
Use your magic wand tool and click inside frame
Select>Modify>Expand by 5px.
Add a new layer below the frame and add gradient or color of choice.
I chose a reflected gradient with colors from the kit. Deselect.
On gradient layer- Filter>Texture>Grain:

Add tube close up above gradient layer. Right-click and Create Clipping Mask.
Change blend mode to Luminosity, Opacity 40%.
Add tube to left side of frame.
Decorate tag with elements from the kit. From bottom to top I used:
Oven
Piggy Pie
Sign
Piggy Candy
Flair 1
Rolling Pin
BBQ Sauce
Bacon Beer
Cupcake
Turkey
With your Wish I Were Taller font, 30pt, type out Save the Turkey.
Click the Create Warped Text button at the top and use these settings:

Filter>Noise>Add Noise 15% Uniform.
Double click to bring up Layer Styles and add a 1px White Stroke, Outside.
Now Command+Click on the word art icon in the layer palette to create a selection around it.
Select>Modify>Expand 2px. Add a new layer below the word art.
Flood fill with color or gradient. Add a drop shadow to the background.
Now let's get our mask ready! Open your mask on a new canvas.
Add a new layer above it, and flood fill with color of choice,
or use a paper from kit .
Make sure your mask layer is activated and Command+A to Select All, Command+C to Copy.
Activate the paper layer, hit Q to turn on Quick Mask mode.
Command+V to paste the mask..it should now be tinted red.
Hit Q to turn off Quick Mask mode and there should now be marching ants on your canvas.
Hit the Add Layer Mask button at the bottom of the layer palette (rectangle with the circle in it)
Right click- convert to smart object
Right click- Rasterize layer
Drag completed mask to your tag canvas as the bottom layer
Resize it if needed.
With your Rectangular Marquee Tool (m), draw out a selection around the entire
tag, just slight smaller than the canvas. Image>Crop.
This will get rid of any stray pixels or drop shadows you don't see.
Image>Trim>Top Left Pixel Corner to remove the excess space.
Add your license and copyright info to the tag.
Add name and any other text of choice.
Merge, save as PNG and enjoy :)
Thank you for trying my tut! If you have any questions or would like to show me your results, feel free to email me (bananas_68@yahoo.com) or friend me on facebook (badge on left of blog)!!
Friday, November 2, 2012

Supplies-
Kit- Samhain Night by Scrappin Krazy Designs. You can find this kit at Twilight Scraps here.
Tube- I'm using the work of Zindy Nielsen. You can find her gorgeous tubes here. Do not use this tube without first purchasing it, and having a valid license.
Mask- WSL_Mask 161 here
Font- Alex Brush
Photoshop CS5
I'm on a Mac, so when I use Command you may need to use Ctrl.
Here we go :)
Command+N to open a new canvas 700x700
Place ele03 and ele20 on canvas and arrange so the are side by side.
Merge the 2 frame layers.
Place p10 or paper of choice behind the frames.
Using your magic wand tool (w) click inside each frame.
Select>Modify>Expand by 5px. Select>Inverse.
Hit delete on paper layer. Deselect.
Add tube to center of tag and duplicate.
On tube copy, change blend mode to Soft Light.
Decorate your tag with elements from the kit.
From bottom to top I used:
48
35
11
54
46
1
33
8
37
40
38
39
56
23
32
4
51
Sharpen elements and add drop shadows.
Now let's get our mask ready! Open your mask on a new canvas.
Add a new layer above it, and flood fill with color of choice,
or use a paper from kit .
Make sure your mask layer is activated and Command+A to Select All, Command+C to Copy.
Activate the paper layer, hit Q to turn on Quick Mask mode.
Command+V to paste the mask..it should now be tinted red.
Hit Q to turn off Quick Mask mode and there should now be marching ants on your canvas.
Hit the Add Layer Mask button at the bottom of the layer palette (rectangle with the circle in it)
Right click- convert to smart object
Right click- Rasterize layer
Drag completed mask to your tag canvas as the bottom layer
Resize it if needed.
With your Rectangular Marquee Tool (m), draw out a selection around the entire
tag, just slight smaller than the canvas. Image>Crop.
This will get rid of any stray pixels or drop shadows you don't see.
Image>Trim>Top Left Pixel Corner to remove the excess space.
Add your license and copyright info to the tag.
Add name and any other text of choice.
Merge, save as PNG and enjoy :)
Thank you for trying my tut! If you have any questions or would like to show me your results, feel free to email me (bananas_68@yahoo.com) or friend me on facebook (badge on left of blog)!!

Supplies:
Kit- Spook Me Baby by Wicked Princess Scraps. This fun kit can be used any time of year with it's great elements and amazing colors! Visit Shani's blog here for where you can get it.
Tube- I'm using the work of Elias Chazoudis. You can find his amazing work here. Do not use his artwork without purchasing it and having a valid license.
Template- Template 1 from KanDee Halloween Collab temps here
Mask- WSL_Mask330 here
Font- GradoGrandoo NF
Photoshop CS5
I'm on a Mac, so when I use Command, you may need to use Ctrl
Here we go :)
Open your template. Image>Duplicate. Close out original.
Delete the Credit and Spider layers.
Add paper 1 above the green circle template layer.
Right click paper and "Create Clipping Mask"to form the paper to the template.
Double click left purple square to bring up layer styles. Choose Color Overlay.
Change color to #c2c798, blend mode Normal. Repeat with right purple square.
Clip paper 2 to right and left teal circles.
Clip paper 10 to orange square.
Add a reflective Gradient Overlay to purple oval using layer styles.
Filter>Artistic>Rough Pastels:

Clip close ups of tube to the purple oval layer. Change blend mode to Screen, Opacity 50%.
Clip paper 6 to green circles layer.
Apply the same Gradient Overlay to the word art layer.
Filter>Noise>Add Noise 30%, Uniform, Monochromatic.
Add your tube. Duplicate. Drop shadow bottom tube.
On tube copy- Filter>Blur>Gaussian Blur 2px.
Change blend mode to Screen, opacity 65%.
Decorate your tag with elements from the kit.
From bottom to top I used-
wingedlips
barbedwireheart
goblet
bottle
spider
cupcake
Now let's get our mask ready! Open your mask on a new canvas.
Add a new layer above it, and flood fill with color of choice,
or use a paper from kit .
Make sure your mask layer is activated and Command+A to Select All, Command+C to Copy.
Activate the paper layer, hit Q to turn on Quick Mask mode.
Command+V to paste the mask..it should now be tinted red.
Hit Q to turn off Quick Mask mode and there should now be marching ants on your canvas.
Hit the Add Layer Mask button at the bottom of the layer palette (rectangle with the circle in it)
Right click- convert to smart object
Right click- Rasterize layer
Drag completed mask to your tag canvas as the bottom layer
Resize it if needed.
With your Rectangular Marquee Tool (m), draw out a selection around the entire
tag, just slight smaller than the canvas. Image>Crop.
This will get rid of any stray pixels or drop shadows you don't see.
Image>Trim>Top Left Pixel Corner to remove the excess space.
Add your license and copyright info to the tag.
Add name and any other text of choice.
Merge, save as PNG and enjoy :)
Thank you for trying my tut! If you have any questions or would like to show me your results, feel free to email me (bananas_68@yahoo.com) or friend me on facebook (badge on left of blog)!!
Thursday, November 1, 2012
These winter paper templates are 1000x1000 and 300dpi. They are fully customizable and opens in layers so you can colorize, add textures, and add or delete layers. Commercial use ok, please read the TOUs provided in the zip file!! You can find both of these at SATC and Pimpin PSPers Warehouse!!


Subscribe to:
Posts
(Atom)
My Blinkies


I Get Creative For
