Find my kits here

Tasha's Playground Fan Page
Find me on Facebook
My Personal CT


Wednesday, February 29, 2012

Choo-Choo!! The O'Scrap Blog Train has left the station!! This month's theme is Pot of gold with lots of green and gold goodies for you to play with! For my part, I decided to offer up some CU/PU OK elements to embellish your St. Patrick's Day kits and tags!! Elements are large tagger size. Please take note of the TOUs included with this download :) And don't forget to stop by the other stations and pick up their goodies!! We are all in different time zones, so if you don't see anything yet, be sure to try again later!!! Enjoy :D
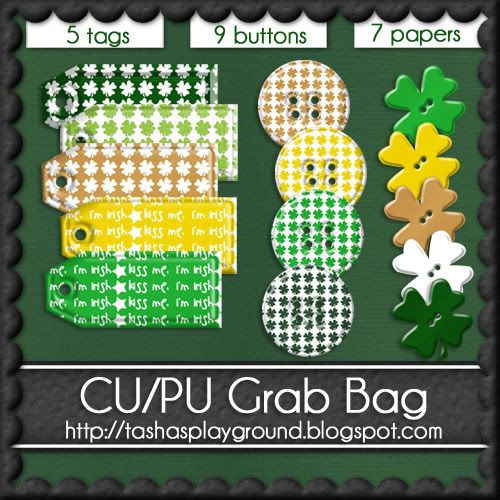
Download my part here

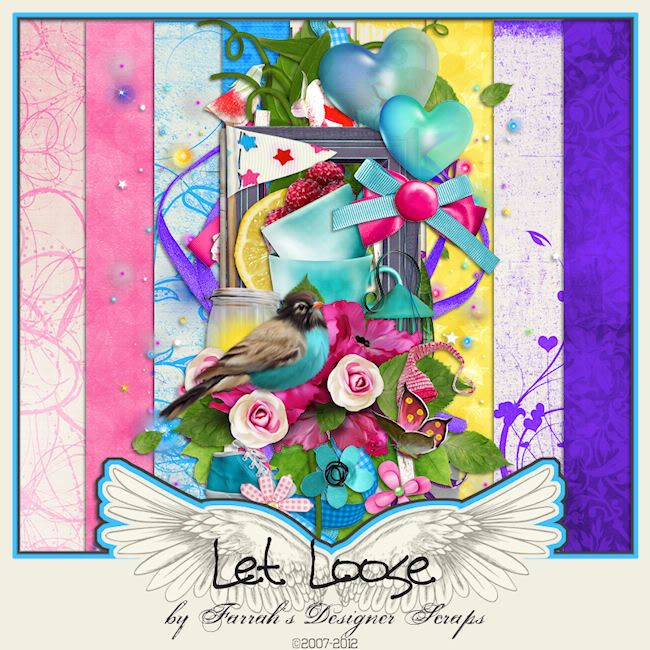
I worked with a stunning kit by Farrah's Designer Scraps called "Let Loose" and was inspired to try another quick page!! The colors in this kit are vivid and gorgeous and will rock any layout or, if resized, any tag :) Thanks, Farrah for this great creation!! This kit is available at Designer Scraps here...enjoy!
This quick page is for personal use only. It comes Full Size in PNG format with a transparent background. Terms of use are very simple- do not share or claim as your own! Thanks :)
Download here


Hey blog readers!!! I did the Scrap Challenge over at my fav hangout, Creative Misfits, and all the kits are now ready to be played with!!! You can only get this and the other kits at the Creative Misfits Creations blog..so what are ya waiting for? Head on over and snag all the goodies!!!! Don't forget to leave a thank you when you get there :)
Tuesday, February 28, 2012
I worked with Wicked Princess' great kit "Mad as a Hatter" and created some snags for you!! This kit is super fun and colorful with a lot of elements to play with!! Check out her blog here for info on where you can purchase this fun kit!

Just click tag to view at 100%, then right-click save to your computer. Please do not alter or copy these tags in any way!! Thank you :)


Check out this hot tag Magik made using one of my collab temps with Amy&Leah!!! You can visit her blog here to check out all her awesome freebies, tuts and tags. Thanks Magik, I love it!!!

And Dixie from PSPing With Friends tried out my St. Patrick's Day banner tut and here are her results!! Thanks Dixie! So glad you liked the tut :)

My CT girls have been hard at work getting you some goodies!!! You ladies rock!
First is a tut by Leah using Splash! here

Next is a FTU tut using The Goodies Garden by Tragedy here

Some cluster frames using G Gurl Swag by Amy here

Some cluster frames using Splash! by Amy here

Some snags using Party Rock by Wicked Princess here

Some snags and tags using Totally Rad by Karra here


And Karra did some more tags with my FTU Denim Days collab here


I think that's everything!! Go visit their blogs and have fun!!!!
Friday, February 24, 2012
Thursday, February 23, 2012

Supplies-
Tube- I'm using a tube by LadyMishka which you can pick up at PFD
Mask- mask1 by Leah at Amy&Leah's Gimptastic Tuts here
Font of choice
Photoshop CS5 or program of choice
(I use a Mac so when I say "Command" you may need to use "Ctrl")
Command+N to open a new image 700x700
Place Clamshell to left of frame
Sit your tube on the clamshell, duplicate tube
on duplicate layer change blend mode to Screen, Opacity 45%
Drop Shadow the original tube layer
Add some elements from the kit to your tag
Resize (Command+T, click chain link in tool bar to keep proportion), angle,
and drop shadow as needed
From bottom to top I used:
flower
anchor
shell 2
flower 3- duplicate, flip, reposition right above clamshell
bubbles
*clamshell*
fish 4
shell 3- duplicate, flip, reposition
flower 2- duplicate, flip, reposition
crabby
starfish
shell
sparkle 2
Position your close up of tube under frame
Activate your magic wand tool and click inside frame
Select>Modify>Expand by 5
Add a new layer under tube close up
Flood fill with color or gradient, or use a paper from the kit
I picked a blue from the tube and filled the selection with that
Now Select>Inverse, activate close up tube layer, hit delete. Deselect
Open your mask, drag paper 5 to that canvas, below the mask layer
Make sure your mask layer is activated and Command+A to Select All
Command+C to copy
Then activate your paper layer, hit Q to enter Quick Mask mode
Command+V to paste mask on paper layer-it should now be tinted red
hit Q on the paper layer to exit Quick Mask mode.
You should now have marching ants outlining where your mask is laying on the paper
Click Add Layer Mask at the bottom of the layer palette
-it's the button that looks like a circle inside a rectangle
Now Right click and Convert to Smart Object
Then right click again and Rasterize Layer
Drag your mask to your tag canvas as the bottom layer
Now add your copyright and license info
Add name and any additional text
Merge, save as PNG and enjoy!!
Thank you for trying my tut. If you have any questions or would like to show me your results, feel free to email me- bananas_68@yahoo.com


All of my kits are $1 at Scraps and the City, today only!!!! Just click the ad above to go to the store and stock up :D
Wednesday, February 22, 2012

Supplies-
Kit- The Irish in Me, a FTU kit here
Tube- I'm using a little cutie by Grafik which you can purchase at PicsForDesign here
Texture of choice- I used one by DarkTheocracy here
Animation of choice- I used LightBurst-clover by Lovey here
Font of choice
Program of choice- I used Photoshop CS5
(I use a Mac so when I say "Command" you may need to use "Ctrl")
Here we go :)
Hit Command+N to open a new image.
Set your banner dimensions- I do 600x200
Flood fill your canvas with a color or gradient of choice-
I did a Reflected gradient using 2 colors picked from my tube
Resize your texture and drag to your canvas- blend mode Soft Light
Add close up of tube to right side-
Blend mode Overlay, Opacity 50%
Add main tube of choice to center of canvas, duplicate
On duplicate- Filter>Blur>Gaussian Blur- radius 2
Blend Mode Screen, Opacity 40%
Duplicate that copy- Blend Mode Hard Light, Opacity 40%
Add drop shadow to original tube-
Opacity 40, Angle 120, Distance 6, Spread 2, Size 4
Add elements from kit to your tag (refer to my example for placement)
Resize (Command+T, click chain link in tool bar to keep proportions equal) and
drop shadow as needed
From bottom to top I used-
stitch2
clock
pot of gold
charm -(Command+J to duplicate,Edit>Transform> flip horizontal, reposition)
flower 1, flower 3, sticker 3- duplicate each numerous times and reposition along bottom
Command+A to Select All, Image>Crop
Now for the border-
add a new layer at the top,
flood fill with gradient from earlier, tick "Reverse" this time to switch color placement
Select All, Select>Modify>Border- Width 6
Select>Inverse, hit delete. Deselect.
I duplicate the frame a few times to make it darker, then merge those layers together
Layer Styles>Stroke- Color White, Width 2, Position Outside
Add copyright and license info
Add name and any text of choice
If you aren't going to animate, you're done!
Merge layers and save as PNG file :)
To animate:
Duplicate Frame layer 2 times for a total of 3 Frame layers
Filter>Noise>Add Noise- 20%, Gaussian, Monochromatic
Repeat on the other 2 frame layers
Hide your top 2 frame layers by clicking the eye next to them
Go back to your Pot of Gold layer. Duplicate this layer 2 times for a total of 3
Press W to use your Magic Wand Tool, click in the rainbow until you have marching ants all around it
Repeat Noise filter from earlier. Repeat on the other 2 frames.
Hide the top 2 layers for these as well.
Open your clover animation, delete the credits layer
highlight all the layers and click Command+G to Group them
Drag Group above your Stitch 2 layer and position where you want
Open group and make sure all the frames in it are hidden except the bottom
(frame 2 for this one)
Windows>Animation, your little box will pop up with your first frame already in it
If it's on Animation (timeline), then toggle it over to Animation (frames)
Since your first frame is already done, duplicate it
Hide the first layer in your clover animation and unhide the next one up
Hide the first Pot of Gold layer and unhide the next one
Hide the first Frame layer and unhide the next one
Duplicate your animation frame
Hide each of the above layers and unhide the next in the series
Keep going until you have used all the clover animation frames
For the Frame and Pot of Gold layers I did- bottom, middle, top, middle, bottom, etc
When you're done, save your tag by going to File>Save for Web & Devices
Make sure you have Looping set to Forever
Save as GIF and you're done :)
Tuesday, February 21, 2012
A few of my wonderful CT girls have created some goodies for you..and they are all FTU!!! Thanks girls, love them all :D
LA Woman by Tragedy here which uses my FTU kit Attitude

Love Spell by Leah here which uses our FTU collab Love Spell

Tragedy's tut using Love Spell is here

Some snags by Wicked Princess here

Monday, February 20, 2012

I have a brand new kit in stores, ready to be played with!! This cute underwater themed kit is a great compliment to your mermaid tubes, and was made to coordinate with Candy Splash by Irmino Pin-oops, available at SATC. Splash! has 46 elements, 13 papers 800x800 and is tagger sized. You can pick it up at SATC and PFD.
Here are some tags made with the kit-
Under the Sea, a tut by Amy here

Letters in the Sand, a tut by Tragedy here

Underwater Dream, a tut by me here :)
Splash, a tut by Leah here
A cluster frame by Amy here
Tuesday, February 14, 2012

Supplies
Tube- I'm using a great tube called "Love Candy" by Irmino pin-oops! which you can purchase from SATC with a valid license. This tube has an AC for you naughty taggers ;p
Mask- SKDS_valmask6 from Kaci here
Font- Grasshopper
Photoshop CS5 or program of choice
(I use a Mac, so when I use "Command" you may need to hit "CTRL" with Windows)
Command+N to open a new, transparent canvas 700x700
Place frame 1 in center of canvas
Drag paper of choice (I used paper 15) and tube close up to canvas
Resize (Command+T) and position under frame
Press W to activate your magic wand tool, click inside the frame
Select>Modify>Expand by 5 pixels
Select>Inverse, hit Delete on your paper and tube layers
Deselect (Command+D)
Activate your tube close up and Command+J to duplicate
change blend mode on bottom layer to Luminosity
change blend mode on top layer to Screen
Add main tube choice, position to left of frame
Command+J and on the top tube layer-
Filter>Blur>Gaussian blur 2, blend mode Screen, Opacity 50%
Drop shadow bottom tube layer
Open your mask layer on a new canvas
Pull paper of choice to mask image, hide paper layer (click the eye next to it)
Make sure your mask layer is activated
Select>Color range- click in the black area of the mask image- OK
Now unhide your paper layer, activate it and hit delete
Command+A, Image>Crop
Drag new mask layer to your original image..
you can close out the canvas you prepped your mask on
Now decorate your tag with elements from the kit
Resize, rotate and add drop shadows as needed
To resize/rotate- Command+T to activate Transform tool
Click the chain link in the work bar (between the W and H) to maintain ratio
To flip an element- Edit>Transform- Flip horizontal/vertical
To add a drop shadow- Open your Layer Styles window by either double clicking the layer, hitting the LayerStyle button at the bottom of your layer palette (looks like "fx") or go to Layer>Layer Style
From bottom to top I used:
cloud
stitches
flower 2
heart 5
sparkle 1
bubble
button 3
folded heart
flower 7
butterfly
tag 1
balloon
frog
Now trim down your excess
Image>Trim- transparent pixels
Resize image if needed- Image>Image Size
Add copyright and license info
Add name and any text
Merge visible layers, save as PNG
Thank you for trying my tut! If you have any questions or would like to show me your results, feel free to email me: bananas_68@yahoo.com
Monday, February 13, 2012

Supplies-
Kit- Wicked Intentionz by Gina's Gems Scraps which is available at Twilight Scraps here. This kit is packed full with 177 elements, 8 frames and 34 papers!!
Tube- I used a gorgeous image by Virgo which is available for purchase from PicsForDesign here with a valid license.
Mask- AR315_CMC_mask140 from the Creative Misfits blog here
Photoshop CS5 or program of choice
(I use a Mac, so when I use "Command" you may need to hit "CTRL" with Windows)
Open a New image (Command+N) 700x700
Place metal frame 1 in center of image
Press W to activate your Magic Wand Tool, click inside each part of the frame
Select>Modify>Expand by 3
Pull paper of choice to image, pressing Shift before you release to center on canvas
Select>Inverse, hit Delete on paper layer, Deselect
Click inside the left frame circle- Select>Modify>Expand by 3
Position close up of tube in selection under frame, Select>Inverse, hit Delete on tube layer
Repeat above steps with remaining frame circles
Play with the blend modes and textures of each close up to get an effect you like.
On the left and right tubes I applied Luminosity blend mode, duplicated and applied Hard Light
On the center tube layer, I applied Luminosity and a canvas texture-
Filter>Texture>Texturizer- Canvas on default settings
Add main tube of choice, duplicate
On top layer- Filter>Blur>Gaussian blur of 2
blend mode Screen, opacity 50
add drop shadow to bottom tube layer
Open your mask layer on a new canvas
Pull paper of choice to mask image, hide paper layer (click the eye next to it)
Make sure your mask layer is activated
Select>Color range- click in the black area of the mask image- OK
Now unhide your paper layer, activate it and hit delete
Command+A, Image>Crop
Drag new mask layer to your original image..
you can close out the canvas you prepped your mask on
Now decorate your tag with elements from the kit
Resize, rotate and add drop shadows as needed
To resize/rotate- Command+T to activate Transform tool
Click the chain link in the work bar (between the W and H) to maintain ratio
To flip an element- Edit>Transform- Flip horizontal/vertical
To add a drop shadow- Open your Layer Styles window by either double clicking the layer, hitting the LayerStyle button at the bottom of your layer palette (looks like "fx") or go to Layer>Layer Style
From bottom to top I used:
goth tree 1- duplicate, reposition
wing element 1
bottle cap 6
jeweled dagger
candle 1
dahlia 1
jewel element 4
wing element 2
candle 5
blown glass bottle
dark angel bowl
When happy, go to Image>Trim>Transparent Pixels
Resize image if needed
Add license and copyright info
Add name and any additional text
Merge, save, enjoy :)
Thank you for trying my tut! If you have any questions or would like to show me your results, feel free to email me: bananas_68@yahoo.com
Thursday, February 9, 2012
I teamed up with my girl annaica's place to bring you this cute collab! Denim Days is filled with shades of blue with a pop of yellow to bring a nice, mellow mood to your tags and give you a break from the holiday tags!!! We hope you enjoy it :D Feel free to mix elements from both kits in your creations. I'd love to see anything you make, just email me- banana_68@yahoo.com Please respect my TOUs and do not share this kit :)


Pick up annaica's part here
The designers at SATC have gone mad!!! $1 deals all day long!!! Stop by and get my kits for $1 today only!!!! You don't want to miss this one! Come visit the store and stock up :D
Monday, February 6, 2012

Supplies-
Kit- Amore by Bibi's Collections. You can get this cute kit from SATC here
Tube- I'm using an Exclusive Club tube by Lady Mishka. You can find more of her work at PFD
Texture- I used #18 from here
Animation- SimoneAni72 here
Font- Scriptina, a FTU font here
PS CS5 or program of choice
(I use a Mac, so when I say "command" you may need to use the "Ctrl" key)
Open a new canvas for a banner- I prefer 600x200
Flood fill with color or gradient of choice- I used the eye dropper tool and picked one from my tube
Open your texture and reduce the image size to the width of your banner
Drag the texture to your banner and place above your flood filled layer
Change blend mode to Screen, opacity 60%
Duplicate Texture layer (command+J)
Edit>transform>flip horizontal
Change blend mode to Hard Light, keep opacity the same
Now place your tube of choice in the center of the banner. A close up works best :)
I duplicated her 2 times for a total of 3 layers:
The bottom layer I drop shadowed
The middle layer- blend mode Soft Light
The top layer- blend mode Screen, opacity 70%
Now use elements from the kit and place them behind all those tube layers
Duplicate, rotate, resize and drop shadow as needed.
I used:
4
6
19
22
28
34
45
50
56
Highlight your background layer, Image>Trim>Top Left Pixel Color
That will get rid of ant extra bits of drop shadow/elements outside the banner
Choose 2 colors for your foreground and background
Command+A on your bottom layer
Add a new layer and move to the top of palette
flood fill with foreground color
Select>Modify>Border- 2 pixels
Select>Inverse, hit delete
Add new layer under that and flood fill with 2nd color of choice (hit X on your keyboard to toggle colors)
Select>Modify>Contract- 1 pixel
hit delete
Add a new layer and flood fill with first color choice
Select>Modify>Contract- 2 pixels
hit delete, Deselect
I refilled each layer with color to make them stand out more, and added noise to the middle layer
Add your license and copyright info to tag
add name and any text
If you aren't going to animate, save now as PNG
To animate:
Open your animation and Group Layers if they aren't already:
Select>All Layers (alt+command+A)
Layer>Group Layers (command+G)
Drag the group over to your banner..I put mine under my tube and above a few elements
Open your group and Hide all the frames except Frame 1 (click the little eye next to them)
Open your Animation Window (Window>Animation)
If needed, Convert to frame animation
-you can do this by clicking the little button in the bottom right of the
animation window that has 3 horizontal squares on it-
You should already have your first animation frame there for you.
Duplicate Selected Frame (the button on the animation window next to the trash can)
In your layer palette, hide Frame 1 and unhide Frame 2
Duplicate Selected Frame
In layer palette, hide Frame 2 and unhide Frame 3
Continue this process until you have all the animation frames done
I set my time delay to 0.1 seconds. View your animation and if you're happy, save :)
File>Save for Web and Devices
Make sure you save as a GIF file
Thank you for trying my tut. If you have any questions or would like to show me your results, feel free to email me: bananas_68@yahoo.com
Subscribe to:
Posts
(Atom)
My Blinkies


I Get Creative For
