Find my kits here

Tasha's Playground Fan Page
Find me on Facebook
My Personal CT


Wednesday, November 30, 2011
The December O'Scrap Blog train has left the station!!! I have for you a mini kit to play with, and mix and match with the kits and elements you'll get along your ride :o) This kit is for Personal Use only, and please do not share!


Tasha's Playground <--you are here
Tuesday, November 29, 2011
Seems I made a mistake linking my sales for Black Fiday/Cyber Monday and they didn't show up in stores all 4 days :( To make up for the inconvenience, I will be doing a 50% off sale from Dec 1 to Dec 15!!!! Hopefully I will get it together this time...not quite sure what I did wrong last time..but I'm gonna figure it out and make it right :D Thanks so much for understanding everyone, and for letting me know!!!


Saturday, November 26, 2011
Yeah, I'm a little late posting lol!!! All my kits at all my stores are 50% OFF!!!!!! Now is the time to buy!!! This sale is good through Monday :D


Wednesday, November 23, 2011

Tuesday, November 22, 2011
Thanks to all of you hard at work with my kits!! It really means a lot to me :D
Stop by these blogs to check out the amazing tuts and tags!!
G Gurl Swag by Breena

FTU Daydreamer by Amy

Fancy by Leah

Black Ice tags by Karra


Monday, November 21, 2011

Supplies-
Kit- "Deputy Brad, Hot Cop!" by Wicked Princess Scraps here
Tube- This Crowe tube is exclusive to the Designer Mall group here. You can find more of Crowe's work for purchase at PTE here
Mask-HorsePlay's Pasture Mask26 here
Template- My own template 3 here
Font of choice
Gimp, or program of choice
Here we go :)
Open the template and hit Ctrl+D to duplicate image
Close out original template
Delete the credits layer
Replace layers of the template with papers from the kit.
To do this, highlight your layer, right click>alpha to selection
open as layers your paper, right click>add alpha channel, resize paper
select>invert, edit>clear (or hit delete on your keyboard)
select>none
add drop shadow
For each layer I used:
1- pp1
2&3- pp5
4&5- pp10
Merge layers 6&7 before you add the paper,
add paper but don't deselect
position close up of your tube on template layers
hit delete and deselect
highlight close up tube
colors>Desaturate w/ Luminosity
duplicate. change blend mode to screen, opacity 50
Repeat the above steps with layers 8&9
Add tube of choice and elements from kit.
Resize and drop shadow as you go along. I used:
(from top to bottom)
rope
caught button
bullet hole
crime scene barrier
2
badge
meds
bullets
evidence bag 1
hat 3 police line do not cross
crop and resize your tag
add copyright and license info
add name and any text
merge, save, enjoy!!
Thank you for trying my tut! If you have any questions or would like to show me your result, please feel free to email me: bananas_68@yahoo.com
Hi all!! I have a new template for you all to play with!! I made this template to go with a kit by Wicked Princess called "Deputy Brad, Hot Cop!" Check out the kit here. Please do not share the template. Instead, direct people to my blog so they can download themselves and look around. I'd love to see anything you make with it!!
Here is a tut I did with the template and kit.
Here is a tut I did with the template and kit.

Sunday, November 20, 2011
I have a fun new kit in stores all ready to be played with!!! Christmas Chaos takes you on a fun trip complete with snowmen, elves, ogres and even dear old Santa Claus!!! Your traditional Christmas colors just got a new look with fun elements just waiting for your designer touch!!! This tagger sized kit contains 55 elements, and 12 papers all at 72DPI. Enjoy!!!
This kit is available in all stores I sell with, which you can find on the left of my blog :D

Saturday, November 19, 2011

Supplies-
Kit- "Rustic Holiday" by KnC Scrapz. This beautiful kit is available for purchase at Lollipops N Gumdrops here
Tube- I'm using a gorgeous tube by Kirshe, available at PFD with a valid license
Mask- HorsePlay's Pasture Mask 36 here
Font- Callie Hand
Gimp, or program of choice
Here we go :)
Open a new canvas 700x700
Open as layers pp6, Right click>add alpha channel, layer to image size
Add layer mask, black (full transparency)
Open as layers your mask. Edit>Copy
Click the black box on your paper layer, Edit>paste
anchor the mask to the paper
Open as layers element2
open as layers pp3, add alpha channel
scale paper layer about 40%, make sure chain is linked
using your eraser tool, get rid of parts of the paper that extend past element2
below your paper layer, add leaf element and drop shadow
Working from above "element2" and going up, add the following:
*resize and drop shadow as you go along*
flakes (no ds)
bow2
tree1
snowbranch
stars
wagon
snowman1
bucket
pinecone
bird
element1
wind
Right below element1, add your tube layer
add a drop shadow
Now crop and resize your image
add copyright and license info
add name and any text
merge, save, enjoy!!
Thank you for trying my tut. If you have any questions or would like to show me your results, feel free to email me: bananas_68@yahoo.com

Supplies-
Kit- "Holiday Magic" by Karinakat Kreations available for purchase at Twilight Scraps here
Tube- I'm using a really cute tube from rzhevskii available for purchase at PFD with a valid license. Thanks so much for the stunning tube!
Mask- MakeAMaskXmasMF02Slow2010 (Sabine's) here
Font- Scriptina, a FTU font
Gimp or program of choice
Here we go :)
Open a new canvas 700x700
Open as layers Papers (22), Right click>add alpha channel, layer to image size
Add layer mask, black (full transparency)
Open as layers your mask. Edit>Copy
Click the black box on your paper layer, Edit>paste
anchor the mask to the paper
Open as layers element 9
rotate to the right about 15 degrees
using your fuzzy select tool, click inside frame
Select>grow by 5 pixels
Under the frame, open as layers Papers (12)
add alpha channel, layer to image size
Select>invert. on paper layer, hit delete
Open as layers a close up of your tube
place above paper, hit delete
deselect
Change blend mode of close up to Screen, opacity 55
drop shadow frame
From bottom to top, open as layers the following:
(resize and drop shadow as you go)
41
2
75
6
36
47
3
29
30
38
62
Open as layers and resize your tube of choice
duplicate and on top tube layer:
Filters>blur>gaussian blur at 3
blend mode Screen, opacity 52
Drop shadow bottom tube layer
Crop and resize your tag
add copyright and license info
add name and any text
merge, save, enjoy!
Thank you for trying my tut!! If you have any questions or would like to show me your results, please feel free to email me: bananas_68@yahoo.com
Friday, November 18, 2011

Supplies-
Kit- I used a gorgeous kit called "Cold As Ice" by A Tagger's Scrap. Check out her blog here for info on where you can buy this stunning kit!
Tube- I'm using the work of Rossana Castellino which you can purchase at DSI with a valid license
Font- Simply Glamorus a FTU font here
GIMP or program of choice
Open a new canvas 700x700
Open as Layers frame1
Using your fuzzy select tool, click inside frame
Select>Grow by 5 pixels
Select>Invert
Open as Layers paper13
right click>add alpha channel
with paper layer activated, hit delete
select>none
add drop shadow to frame
Below your paper layer, open as layers and resize the following:
snowy trees
circles- duplicate, flip horizontally
add drop shadow to trees
Above your frame layer, open as layers and resize the following:
iceflower
gemsnowflake1
flower10
flower9
flower8
music
angel
Open your tube, place on tag
duplicate tube layer
On top copy, I want to give her a very subtle glow
filters>blur>gaussian blur 2
Change blend mode to Hard Light or whatever suits your tube
lower opacity to around 40
Now crop and resize your tag
add license and copyright info
add name and any text
merge, save, enjoy :)
Thank you for trying my tut. If you have any questions or would like to show me your results, feel free to email me: bananas_68@yahoo.com
Thursday, November 17, 2011
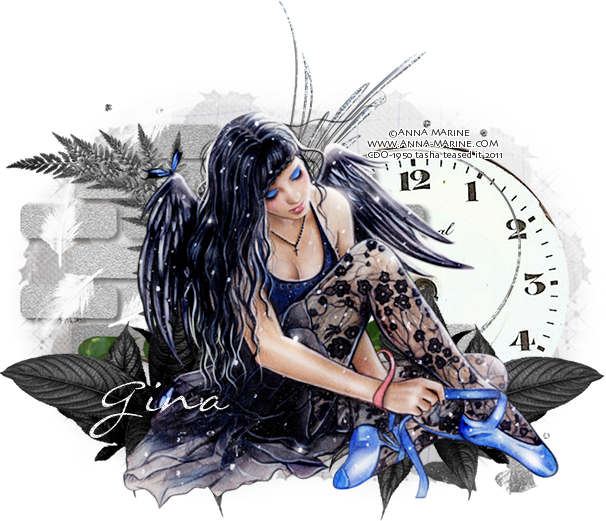
Supplies-
Kit- "Diamond" by KiKeKa Kits available at Designer Scraps here
Tube- I'm using a bonus tube by Anna Marine. You can purchase her work from CDO with a valid license
Mask- WSL_Mask338 here
Font of choice
GIMP or program of choice
Open a new canvas 650x650
Open as layers paper06. Layer to image size, and add alpha channel.
Add layer mask, black (full transparency)
Open as layers your mask. Edit>Copy
Click the black box on your paper layer, Edit>paste
anchor the mask to the paper
Open as layers the following elements
Scale layers (with chain linked) and drop shadow as you go:
scatter02
clock01
bricks01
feather02
leaves02
florish01
branch04
branch05
leaves01- duplicate, flip horizontal, reposition
Add tube of choice. Duplicate
On top tube layer:
blend mode, screen. Opacity 70
Crop and resize your tag
add copyright and license info
add name and any text
merge, save, enjoy!!
Thank you for trying my tut. If you have any questions or would like to show me your results, feel free to email me: bananas_68@yahoo.com

Supplies-
Kit- Candy Treats by KittzKreationz here
Tube- I'm using a great tube by aLDoDarK, available for purchase at SATC with a valid license
Mask- WSL_Mask316 here
Font of choice
GIMP or program of choice
Open a new canvas 650x650
Open as layers P2. Layer to image size, and add alpha channel.
Add layer mask, black (full transparency)
Open as layers your mask. Edit>Copy
Click the black box on your paper layer, Edit>paste
anchor the mask to the paper
Open as layers Cherry Sweet Frame
Use your fuzzy wand tool and click inside frame
Select>Grow by 7 pixels. Select>Invert
Open as layers P1, add alpha channel
activate paper layer and hit delete
add drop shadow to frame
Add your tube, duplicate
Change top layer's blend mode to screen
lower opacity to 40
drop shadow the bottom tube layer
Add elements to your tag
Make sure when you scale, that the chain is linked
I used:
Candy Pop Treat- rotate left a bit
Curled Ribbon
bow star
gumball
cake dome with cakes
cupcake
cute bunny
Crop and resize your tag
add copyright and license info
add name and any text
merge, save, enjoy!
Thank you for trying my tut. If you have any questions or would like to show me your results, feel free to email me: bananas_68@yahoo.com
Tuesday, November 15, 2011

Monday, November 14, 2011

Supplies-
Kit- "Vintage Styling" a FTU kit from Jo here
Tube- Jason Patterson available for purchase at PTE with a valid license
Mask- WSL_Mask316 here
Font of choice
GIMP, or program of choice
Open a new canvas 650x650
open as layers paper31
open as layers your mask
right click paper layer and Add Layer Mask-Black (full transparency)
Activate mask layer and Edit>Copy
Activate paper layer, click the black box, Edit>Copy
Anchor the floating mask layer to the paper layer
delete the mask layer
Open as Layers frame5
use your fuzzy select tool and click inside frame
select>invert
open as layers paper6. Right click and add alpha channel
hit delete on keyboard on paper layer
select>none
Add main tube of choice
Duplicate. On top tube layer:
Filters>Blur>Gaussian blur 3
Change blend mode to screen, opacity 80
We just want to add a soft glow, not make her look weird ;p
Drop shadow bottom tube layer
Now decorate your tag with elements from the kit
I used:
flower 6
bag
bow 7
bicycle
flowers
button 1
lamp
Add drop shadows as needed
Now crop and resize your tag
add license and copyright info
add name and any text
merge, save, and enjoy!!
Thank you for trying my tut! If you have any questions, or would like to show me your results, feel free to email me: bananas_68@yahoo.com
Sunday, November 13, 2011

Supplies-
Gimp, or program of choice
Kit- "Sweet as Candy" by Stef's Scrapkits, available at Lollipops N Gumdrops here
Tube- I'm using a gorgeous tube by Ellie_Milk available at PFD here
Mask- Sas Luv' Scrap Mask #11 here
Template- Template 9- Pinky here
Font of choice
Open your template
Replace template layers with papers from the kit.
To do this, activate template layer, right click: alpha to selection
add paper, right click, add alpha channel
Select>Invert, Edit>Clear (or hit delete on your keyboard)
Delete original layers as you go along. I used:
Raster 10- pap09
delete raster 9
Raster 6 & copy of raster 6- pap11
Raster 4 & 2- Filters>noise>RGB noise @ 50
Raster 1- pap04
Raster 7 & copy of raster 7- pap13
Copy (2) and (3) of raster 7- colorize to white
add drop shadow to layers
I used (0, 0, 10, 60)
Add tube of choice and drop shadow
Now decorate your tag with elements
add a drop shadow (ds) as you go along
from bottom to top I did:
ele60
ele58
ele52
ele43- ds
ele37- ds
ele31
ele29- ds
ele64- ds
ele11- ds
ele10- ds
ele02- ds
Open as layers pap13
open as layers your mask
right click pap13 and Add Layer Mask, Black
activate your mask layer, edit>copy
activate the black box with your paper layer, edit>paste
anchor selection
Add noise to mask layer
Now crop and resize your tag
add license and copyright info
ad name and any text
merge, save and enjoy!
Thank you for trying my tut!! If you have any questions or would like to show me your results, feel free to email me: bananas_68@yahoo.com
Subscribe to:
Posts
(Atom)
My Blinkies


I Get Creative For
