Find my kits here

Tasha's Playground Fan Page
Find me on Facebook
My Personal CT


Monday, December 31, 2012

Take a walk on the dark side with my newest kit, Vamp/Goth. A little bloody, a little sinister...a lot of inspiration! 79 elements, 11 papers, tagger sized. Personal use only. Do not share, do not copy.
You can find this kit in my stores listed on the left of my blog. I'd love to see any tags made with it, just email me or post them to my facebook :o)
Have a Happy 2013!!!!
Head on over to Kiya Designs to pick up this great cluster made with the kit-

And check out these fantastic tags she made me!!!


Head on over to Kiya Designs to pick up this great cluster made with the kit-
And check out these fantastic tags she made me!!!
Sunday, December 30, 2012
Ice is Nice is a stunning kit by A Taggers Scrap that will make those chilly tags sparkle and shine! This kit has over 100 unique elements and even a freebie add-on!!! Visit Jo's blog here for info on where you can get this great kit.
Here is a FTU cluster frame I made with the kit. This is for personal use only. You can grab it here or here.

And then here are some extras I made with the kit, using the equally stunning work of Verymany, which you can purchase from PicsForDesign here.
Click the tags to view full size, then save to your computer. Do not alter, resize, add names to, or claim these extras as your own. Thanks!!


Saturday, December 29, 2012
Winter Woods by Gimptastic Scraps is a great kit for your winter taggies!! Visit her blog here to find out where you can get it :) I have some extras using the kit, featuring an exclusive tube by Ellie Milk, which is available at PFD.
Click tags to view full size, then save to your computer. Please upload these tags to your own photo hosting account. Do not alter, resize, add names or claim as your own. Thanks and enjoy!


Tuesday, December 25, 2012
Your last stop for the 12 days of freebies is Sarah's blog where you can pick up some fab timeline covers!!! Thanks for joining us, and hope you enjoy all the goodies!!!

On the 11th day of freebies, Amy & Leah have made some great goodies- a New Years kit with matching tag templates!!! Head over to their bog here to snag them!!


Saturday, December 22, 2012


Thursday, December 20, 2012
On the 8th day of Christmas...you can head over to Amy & Leah's Gimptastic Tuts to pick up these great freebies!! Don't forget to leave a thank you :)


Wednesday, December 19, 2012
Welcome to Day 7 of your 12 days of Christmas freebies!!! Are you having fun yet??
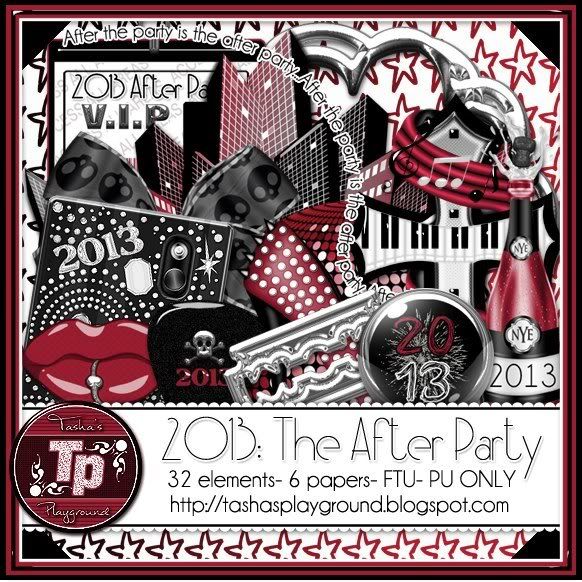
I recently released a New Years kit called 2013 Party. And after any good party, you need an after party!!!! So that's what I have for you today :o) So let your hair down and get wild with 2013: The After Party!!! I'd love to see any tags you make with this!!
Tuesday, December 18, 2012
Oooohhh, we're half way done with our 12 Days of Freebies...hope you all are having fun snagging up all these goodies!! Today, take a trip to Sarah's Tags -N- Things for this cute kit:

Monday, December 17, 2012


I just love Eugene Rzhevskii's and when I saw his latest Christmas girl I just had to have her! I made myself a timeline banner with her, and some of his other tubes. You can find his work at PicsForDesign here. Eugene's work should not be used without a license. Hope you like!
The kit I used for this banner is Bright & Beautiful Xmas by A Taggers Scrap here.
The template I used is from Millie's PSP Madness here

*click banner to view larger*
Sunday, December 16, 2012
For Day 4, I decided to make some of my old PTU kits freebies!!! Out with the old, in with the new, right? These are from when I first started selling--in fact, G Gurl Swag was my first PTU kit!!! It's kind of bitter sweet giving it away now lol.
Come by tomorrow to see where and what your next freebie is!!
2 Cute 2 Spook or here or here
Christmas Chaos or here or here
G Gurl Swag or here or here
Heavenly Peace or here or here
Totally Rad or here or here


Supplies:
Kit- Peppermint Winter by Sarah's Tags -N- Things here
Tube- iGirl by FourXDesigns here. This is a multi-layered tube.
You must purchase this tube and have a valid license to use it.
Template- Temp 163-Leah from Gimptastic Tuts here
Mask- WSL_Mask 309 here
Font- Birch STD
Photoshop CS5 or program of choice
I'm on a Mac so when I use Command you may need to use Ctrl
Here we go :)
Open your template. Image>Duplicate, close out original.
Delete the credits layer.
Working from bottom to top on the template-
layer 10- colorize to black
layer 9- place paper 4 above it, then right click and Create Clipping Mask
layer 6- add 2px white stroke, clip paper 8
layer 5- Filter>Noise>Add Noise 45%, Uniform, Monochromatic
layer 4- command+F to repeat noise
layer 3 & 2- clip paper 3
layer 1- add 2 px white stroke, clip paper 1
Colorize your word and word back layers to match kit and tube.
Add elements from the kit to your tag. From bottom to top I used:
25- clip to paper 1/layer 1
19
6
15
34
8
2
20
4
Add tube and drop shadows.
Now let's get our mask ready! Open your mask on a new canvas.
Add a new layer above it, and flood fill with color of choice,
or use a paper from kit .
Make sure your mask layer is activated and Command+A to Select All, Command+C to Copy.
Activate the paper layer, hit Q to turn on Quick Mask mode.
Command+V to paste the mask..it should now be tinted red.
Hit Q to turn off Quick Mask mode and there should now be marching ants on your canvas.
Hit the Add Layer Mask button at the bottom of the layer palette (rectangle with the circle in it)
Right click- convert to smart object
Right click- Rasterize layer
Drag completed mask to your tag canvas as the bottom layer
Resize it if needed.
With your Rectangular Marquee Tool (m), draw out a selection around the entire
tag, just slight smaller than the canvas. Image>Crop.
This will get rid of any stray pixels or drop shadows you don't see.
Image>Trim>Top Left Pixel Corner to remove the excess space.
Add your license and copyright info to the tag.
Add name and any other text of choice.
Merge, save as PNG and enjoy :)
Thank you for trying my tut! If you have any questions or would like to show me your results, feel free to email me (bananas_68@yahoo.com) or friend me on facebook (badge on left of blog)!!

Supplies:
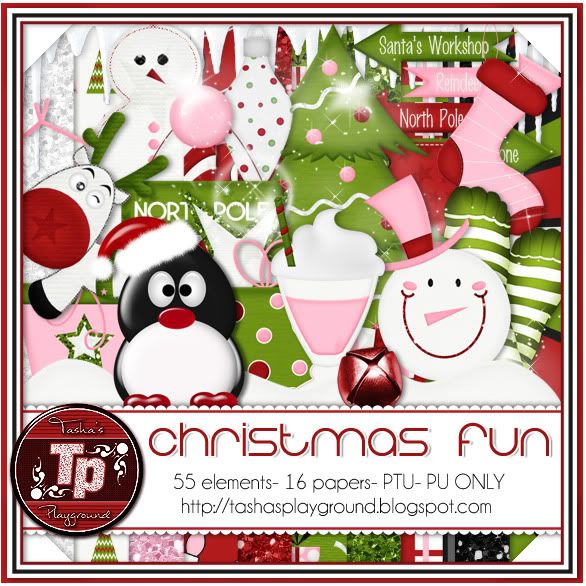
Kit- Ginger Christmas by Gimptastic Scraps. Pick up this yummy kit here.
Tube- I'm using Xmas Virgo by Shawli. You can buy this tube here at TPP with a valid license.
Template- Collab temp by Pixie and Millie here
Mask- DBV Xmas Mask 6 by Vaybs here
Texture- Texture 2 here
Brush- Snow 10 by Dark Yarrow here
Font- The Wizard
Photoshop CS5 or program of choice
I'm on a Mac, so when I use Command you may need to use Ctrl
Here we go :)
Open up your template. Image>Duplicate. Close out original.
Delete layers 1, 2, 3, 9, 10 and credits.
Image>Canvas size and increase to about 750x750 so you have room to work.
Place paper 4 above layer 4. Right click paper and Create Clipping Mask.
Drop shadow the template layer.
If you don't like where you clipped it, simply use your mouse to drag the paper layer around until
you are satisfied with it's placement. No need to release the clipping mask!
Repeat with the remaining layers:
layer 5 & 6- paper 5
layer 7- paper 8
layer 8- double click to open layer styles. Choose a green/white gradient, reflected. Rasterize layer.
Clip your texture to layer 8. Change blend mode to Overlay, opacity 90%.
layer 2- Command+U to bring up Hue/Saturation. Drag the Lightness slider all the way to the
right so the word art turns white.
Filter>Noise>Add Noise 45%, Uniform, Monochromatic.
Open layer styles and add a 2px green stroke, outside.
Add tube and Command+J to duplicate. On top tube copy:
Filter>blur>gaussian blur 3px. Blend mode Screen, opacity 66%.
Drop shadow bottom tube layer.
Now decorate your tag with elements from the kit. I used:
Gift 2
Gift 3
Cookie 2
Bag
Mittens
Holly
Cupcake
Bauble 2
Ornament 1
Candy Stick 2
Ball 1
Jelly bean 1
Jelly bean 2
Below the word art, add a new layer. Make sure your foreground color is white and add some snowflakes with your brush tool.
Now let's get our mask ready! Open your mask on a new canvas.
Add a new layer above it, and flood fill with color of choice,
or use a paper from kit .
Make sure your mask layer is activated and Command+A to Select All, Command+C to Copy.
Activate the paper layer, hit Q to turn on Quick Mask mode.
Command+V to paste the mask..it should now be tinted red.
Hit Q to turn off Quick Mask mode and there should now be marching ants on your canvas.
Hit the Add Layer Mask button at the bottom of the layer palette (rectangle with the circle in it)
Right click- convert to smart object
Right click- Rasterize layer
Drag completed mask to your tag canvas as the bottom layer
Resize it if needed.
With your Rectangular Marquee Tool (m), draw out a selection around the entire
tag, just slight smaller than the canvas. Image>Crop.
This will get rid of any stray pixels or drop shadows you don't see.
Image>Trim>Top Left Pixel Corner to remove the excess space.
Add your license and copyright info to the tag.
Add name and any other text of choice.
Merge, save as PNG and enjoy :)
Thank you for trying my tut! If you have any questions or would like to show me your results, feel free to email me (bananas_68@yahoo.com) or friend me on facebook (badge on left of blog)!!
Saturday, December 15, 2012

Supplies:
Kit- Old Navy Xmas by A Taggers Scrap. This beautiful kit can be found here, and it comes with a great freebie add-on!!
Tube- Simona by Zlata M which you can find at PFD here
Mask- Mask 27 from HorsePlays Pasture here
Font- Callie Hand
Photoshop CS5 or program of choice
I'm a Mac, so when I use Command you may need to use Ctrl.
Here we go :)
Command+N to open a new canvas 700x700.
Place frame1 in center. Add paper of choice behind frame.
Click inside frame with magic wand tool.
Select>Modify>Expand by 5 px.
Select>Inverse. Hit Delete on paper layer. Deselect.
Open layer styles and drop shadow frame.
Add tube to center of tag. Duplicate. On top copy:
Filter>Blur>Gaussian blur 2px. Blend mode Screen, Opacity 55%.
Drop shadow bottom tube layer.
Add elements from the kit to your tag.
From bottom to top I used:
Snow (duplicate 2x, rearrange)
tree 2
candle 1
ribbon 1
reindeer 1
ornament 10
gift 5
ornament 11
flower 5
gift
ribbon 5
ornament 16
snowman
bell
bow1
Add drop shadows to elements as needed.
Now let's get our mask ready! Open your mask on a new canvas.
Add a new layer above it, and flood fill with color of choice,
or use a paper from kit .
Make sure your mask layer is activated and Command+A to Select All, Command+C to Copy.
Activate the paper layer, hit Q to turn on Quick Mask mode.
Command+V to paste the mask..it should now be tinted red.
Hit Q to turn off Quick Mask mode and there should now be marching ants on your canvas.
Hit the Add Layer Mask button at the bottom of the layer palette (rectangle with the circle in it)
Right click- convert to smart object
Right click- Rasterize layer
Drag completed mask to your tag canvas as the bottom layer
Resize it if needed.
With your Rectangular Marquee Tool (m), draw out a selection around the entire
tag, just slight smaller than the canvas. Image>Crop.
This will get rid of any stray pixels or drop shadows you don't see.
Image>Trim>Top Left Pixel Corner to remove the excess space.
Add your license and copyright info to the tag.
Add name and any other text of choice.
Merge, save as PNG and enjoy :)
Thank you for trying my tut! If you have any questions or would like to show me your results, feel free to email me (bananas_68@yahoo.com) or friend me on facebook (badge on left of blog)!!
Soxsational Scraps has released this jam packed kit called Happy Freaking Everything, which has elements in it for 9 major holidays!! I played with it and made three sets of extras...but there are so many options with this kit I'm sure I'll be back later with more :o)
Visit Soxie's blog here for info on where you can purchase this fun kit!!

To save the extras, click to view full size and then right-click save to computer.
Do not alter, add names, resize or claim as your own.


Sarah's Tags N Things is where you can find your next freebie! She has some CU items for you. Find them here.
Stop back by tomorrow for your next freebie :o)

Friday, December 14, 2012
Head on over to Amy & Leah's Gimptastic Tuts to snag up these great freebies for Day 2 :)
You can find them here.
Check back tomorrow to find out where the next freebie is!


Thursday, December 13, 2012
Welcome to the 12 Days of Christmas Freebies!!!! I teamed up with Sarah's Tags N Things and Amy & Leah's Gimptastic Tuts, and for the next 12 days you can visit one of our blogs to download some amazing PU or CU freebies!!! I've seen the previews, and trust me...you don't want to miss out on these goodies :o)
So..on to the freebie!!! I have a cute little mini kit for you all to play with!!! Feel free to share my blog link with others, but please don't share the kit!! I hope you all enjoy it, and I'd love to see any tags you make with it! You can download the kit here.
And as an added bonus, for today (Dec. 13, 2012) only, I've marked all my kits at The PSP Project down to 50% off!!! Be sure to stop back by tomorrow and see where and what your next freebie is :o)

Tuesday, December 11, 2012
Mojo lagging? Need some holiday tagging inspiration? Take a look here at some the latest creations my crazy talented CT have made with my latest kits!!! These girls sure can rock out a tag :o)
Monday, December 10, 2012
Bring in 2013 with this sexy new kit!!! This tagger sized kit has 55 elements and 12 fun papers to help you ring in your New Year!! Find it at any of my stores listed to the left!

I finally have a Christmas kit to play with..and I decided to go cute with it!! I had a lot of fun making this, and I hope you have just as much fun making tags with it :o) Don't forget, I am still having my moving in sale at DSI, but hurry, because it won't last long!!! You can pick this kit up at any of my stores listed to the left...enjoy!
Subscribe to:
Posts
(Atom)
My Blinkies


I Get Creative For
