Search
Sign up for my Newsletter
Tasha's Playground Fan Page
Find me on Facebook
Followers
Saturday, June 9, 2012
Supplies:
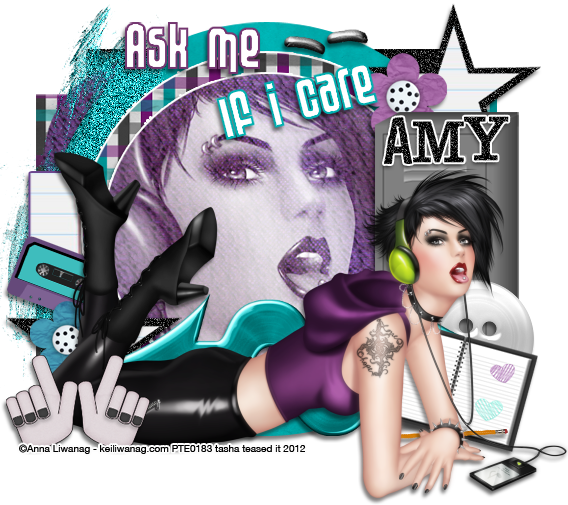
Kit- Electric Youth by Gimptastic Scraps which you can find at Artistic Angels here.
Tube- Anna Liwanag which I purchased at PTE when they were open. You can now find her work at CDO here.
Template- Temp110 by Leah here
Font- Jailbird Jenna or font of choice
Photoshop CS5 or program of choice
I'm on a Mac so when I use Command you may need to use Ctrl
Here we go :)
Open your template. Image>Duplicate. Close out original.
Delete the credit layer. Rearrange Word Art layers to top of template.
Image>Resize to resize the template if you want.
Image>Canvas Size if you want to increase your work space...I changed mine
to around 700x700 because I like room to work :)
Let's work the template from bottom to top-
Activate Square layer. Filter>Noise>Add Noise:
25%, Gaussian, Monochromatic.
Activate rect2 layer. Command+Click the icon in the layer window to create a selection around it.
Add Paper 1 over selection. Select>Inverse. Hit Delete on paper layer. Deselect.
Delete original template layer.
Using the method above, add papers from the kit to the following layers:
Circle 4 & 5- paper 5
Circle 3- paper 2
Rect 1- paper 6
Circle 2- paper 1
Circle 1- paper 5
Star 3- paper 6
Star 1- paper 6
On Star 4 & 2 layers, Command+U to open Hue/Saturation window. Colorize to black by moving
the Lightness slider all the way to the left. Command+F to add same Noise as before.
Activate your top circle layer and create a selection around it.
Add close up of tube as a new layer above selection.
Select>Inverse. Hit Delete on tube layer. Deselect.
Shift+Command+U to Desaturate close up.
Change blend mode to Screen.
Now double click circle layer to bring up layer styles box.
Add a 2px white Stroke, Outside, Normal, Opacity 100.
Add same stroke to the circle layer below that.
Add a purple stroke to the rectangle layer.
To the word art layers, add Strokes picking colors from the kit, but choose Inside instead of Outside.
Add main tube of choice. Command+J to duplicate.
On top copy, Filter>Blur>Gaussian Blur 2px.
Change blend mode to Screen, Opacity 45%. Drop shadow bottom tube layer.
Now decorate your tag with elements from the kit.
From bottom to top I used:
glitter paint
cassette tape
flower 1
flower 2
locker
button 3
arrow 2
notebook
pencil
chalk heart 1
chalk heart 2
whatevs
staple
Add drop shadows to elements and template layers.
Using your Rectangle Marquee Tool (m), create a selection around the entire tag,
just a bit smaller than the canvas.
Image>Crop. This should get rid of any stray pixels/drop shadows.
Image>Trim>top left pixel color. This will remove excess space.
Add your copyright and license info.
Add name and any text of choice.
Merge, save, enjoy :)
Thank you for trying my tut! If you have any questions or would like to show me your results, feel free to email me at bananas_68@yahoo.com or contact me on Facebook.
Labels:CDO,Gimptastic Scraps,Photoshop tut,PTE,PTU tut
Subscribe to:
Post Comments
(Atom)
Leave me some love
Labels
- A Space Between
- A Tagger's Scrap
- Abstract Creations
- Alena Lazareva
- Andreea Cernestean
- animated
- Announcement
- Autumn
- Autumn Blaze
- Autumn Breeze
- awards
- Birthstone Series
- blog train
- Cartoon Pink
- CDO
- Christmas
- Cluster Frame
- CT call
- Ct Tag
- Ct Team
- Cuddly Rigor Mortis
- dark/goth
- Designer Scraps
- Digital Chaos
- Dirk Richter
- DSI
- Elias Chatzoudis
- Enys Guerrero
- FB Timeline Cover
- Fluff
- Forum Set
- FourXDesigns
- freebie
- FTU CU
- FTU kit
- FTU tut
- Full Size Kit
- Gimptastic Scraps
- Gorjuss
- Halloween
- IB kit
- Keith Garvey
- KiwiFireStorm
- Lollipops N Gumdrops
- Molly Harrison
- New Years
- No Scrap
- PFD
- Photoshop tut
- Pimpin PSPers
- Previously Released
- PTE
- PTU CU
- PTU kit
- PTU tut
- quick page
- Rebecca Sinz
- Rosanna Castellino
- sale
- Sarah's Tags N Things
- Scrap-U-Nique
- Shawli
- Sheena Pike
- snaggable
- Soxsational Scraps
- Spazzd Art
- spring
- St. Patrick's Day
- Standalone kits
- summer
- Summer Haze
- tag show off
- tags
- tags with my kits
- tags with my templates
- Tasha's CT
- template
- Thanksgiving
- TPP
- tut result
- Twilight Scraps
- Valentine
- Whispered Bliss
- Wicked Princess Scraps
- Winter
- wordart


0 comments:
Post a Comment