Find my kits here

Tasha's Playground Fan Page
Find me on Facebook
My Personal CT


Monday, October 31, 2011
Hope everyone has a safe and spooky Halloween!! I can't wait to steal my little man's candy ;o) Still no PSP for me :( And all these new tubes that PFD is putting out just makes me miss tagging more and more!! Until I can play, I'll just be a shameless siggy piggy :) Have a great week everyone!!!
Monday, October 24, 2011
I'll do the good news first..I just reached 100 followers!! Yaaaayyy!! And I didn't even have to offer anyone free tubes to do it ;p Thanks everyone who has decided to click that little button, it really does mean a lot to me :o) I'll be sure to get lots more freebies and FTU tuts up as my way of saying thank you!!!
Which brings me to my bad news..my laptop has gone all wonky and won't keep a charge. I won't be able to get it looked at for at least 2 weeks, and that's where allll my PSP stuff is! Hubby doesn't want me to download anything to the desktop, so that means no new stuff until I get it fixed =/ Unless I start getting cold sweats from PSP withdrawls and take it in sooner, lol. But if I wait, then I can get it looked at for free, and I like that option better!! So you may just see a lot of random updates from me until I get it sorted!!
Which brings me to my bad news..my laptop has gone all wonky and won't keep a charge. I won't be able to get it looked at for at least 2 weeks, and that's where allll my PSP stuff is! Hubby doesn't want me to download anything to the desktop, so that means no new stuff until I get it fixed =/ Unless I start getting cold sweats from PSP withdrawls and take it in sooner, lol. But if I wait, then I can get it looked at for free, and I like that option better!! So you may just see a lot of random updates from me until I get it sorted!!
Saturday, October 22, 2011

Supplies:
Kit- I used a FTU BCA kit available from Dreamland Designs here. Thank you for the great freebie!
Tube- I am using a gorgeous BCA tube by Rac which you can purchase here with a valid license.
Template- I used one by Tonya here
Mask- Mask 34 by The Brutal Designs here
Font- The NautiGirl, a FTU font
Here we go :)
Open your template, CTRL+D, delete original
remove the copyright and word art layer
Add papers to each template layer
I used:
Circle 1 & 2- paper 12
Smaller Rectangle 1 & 2- paper 7
Rectangle- paper 11
Rectangle Back- Add Noise: Uniform 95%
Delete original template layers
Activate paper 11 (originally Rectangle layer)
Selections>select all>float>defloat
c/p tube of choice into selection
position how you want
selections>invert, hit delete on keyboard
repeat with a mirrored image of the tube
Change blend mode to suit your tube
I used Hard Light
c/p back lace onto canvas right above circle layers
image>rotate>free rotate right 45 degrees
c/p sequins and position around backlace
c/p white safety pin and place towards the bottom of tag, as top layer
c/p black bow and place towards the bottom of tag
c/p dreamland ribbon, position to the left. duplicate and mirror
c/p glass and staple and position on tag
Add main tube of choice
I gave mine a soft glow-
Duplicate tube, adjust>blur>gaussian blur at 3
blend mode Screen, opacity 25
duplicate that layer, blend mode soft layer, opacity 78
drop shadow original (bottom) tube layer
crop and resize your tag
add copyright and license info
add name and any additional text
drop shadow your elements
merge, save, enjoy!
Thank you for trying my tut. If you have any questions, or would like to show me your results, feel free to email me: bananas_68@yahoo.com
Friday, October 21, 2011
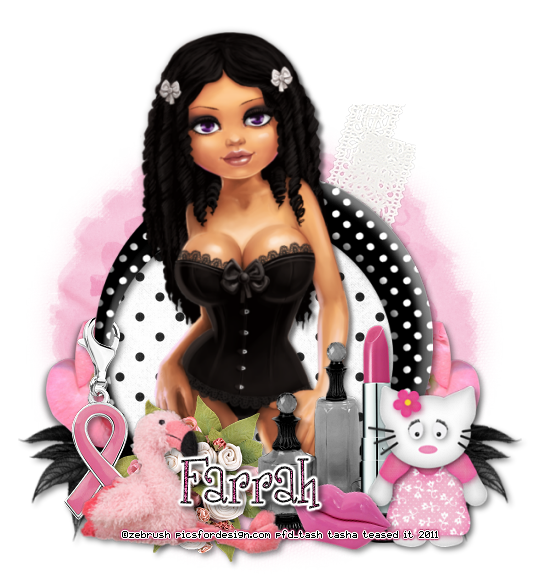
Supplies:
Kit- "Miss Kitty" by Farrah, on sale at Designer Scraps here
Tube- I'm using a hot, multi-layer tube by Zebrush, available for purchase at PFD here. You must have a valid license to use this artwork.
Mask of choice- I used one from here, but can't remember which one, lol, sorry
Font- Girls Are Weird, a FTU font here
Here we go!
This is a Full Size kit, so you will need to resize as you see fit
Open a new canvas 650x650
c/p paper of choice onto canvas
layers>new mask layer>from image
apply mask, merge group
c/p and resize leaf
duplicate and mirror
c/p and resize flowers4
duplicate and mirror
c/p and resize lace
c/p frame4, place lower center on mask
using your magic wand too, click inside frame layer
selections>modify>expand by 5
selections>invert
c/p paper 7 onto canvas, hit delete on keyboard
deselect
add main tube, duplicate
on top layer, adjust>gaussian blur 2
change blend mode to overlay, opacity 35
drop shadow bottom tube layer
add the following elements:
flowers1
bottles
lipstick
charm
flamingo
cat
lips
crop and resize tag
add copyright and license info
add name and any text
merge, save, enjoy!
Thank you for trying out my tut! If you have any questions or would like to show me your results, feel free to email me: bananas_68@yahoo.com
Wednesday, October 19, 2011

Supplies-
Kit: "November Harvest" by Gina's Gems Scraps. This kit is available at Twilight Scraps here
Tube: I'm using the work of Ismael Rac available for purchase here. You must have a valid license to use his work.
Mask: WSL_Mask61 here
Font of choice
Here we go :)
Open a new canvas 650x650
c/p paper 33 onto canvas
layers>new mask layer>from image
apply mask, merge group.
duplicate and merge mask layers
c/p wordart onto canvas
place tube of choice behind wordart
From the bottom to top c/p and resize the following-
leaves deco 2
felt flower
branch 2
branch 3
botanical flower
hortensia 5
scarecrow
pumpkin 1
pumpkin 2
beaded rope bow
quilted turkey 2
sunflower 5
sunflower 4
candle arrangement 2
apple
crop and resize tag
add copyright and license info
add name and any text
sharpen and drop shadow elements
merge, save, enjoy!
Thank you for trying my tut. If you have any questions, or would like to show me your result, feel free to email me: bananas_68@yahoo.com
Lesia made some beautiful extras using my freebie kit 'The Goodies Garden'. Visit her blog here to snag them!

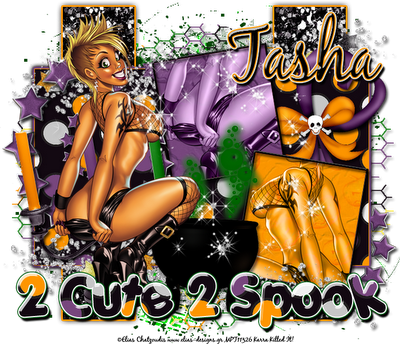
Shayuri also worked with my '2 Cute 2 Spook' kit, and has a tut for ya here

Monday, October 17, 2011
The zombies must have taken over, because from now until the end of October, all of my products will be 30% off!!! Take advantage of this great deal today by visiting any of the stores I sell at!!!


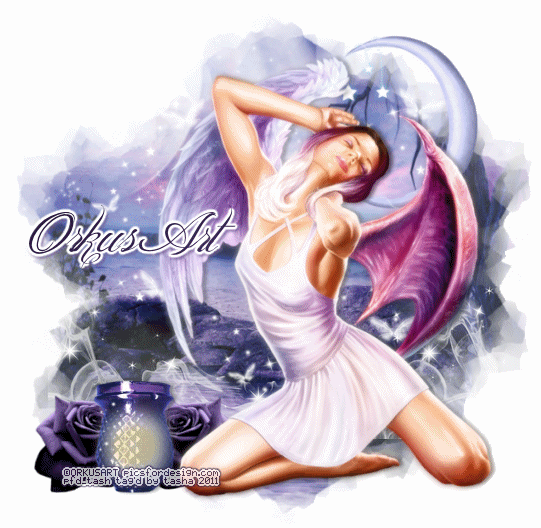
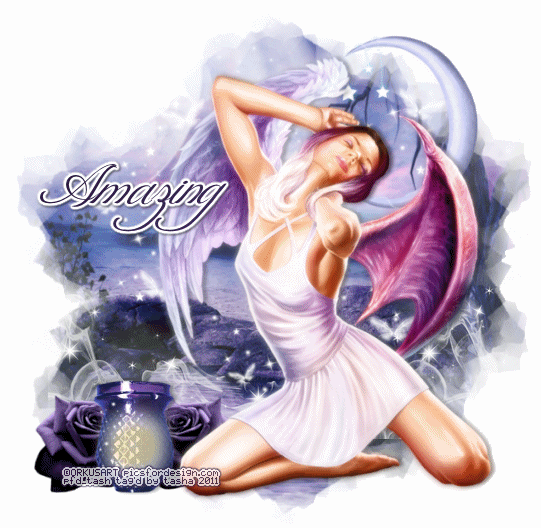
Here are some extras for you to snag using an amazing tube by Orkus Art. This is a multi-layered tube which can be purchased from PFD with a valid license! She has a halo, each wing, and her dress each on a second layer. So many possibilities!!!
Just click on the tag to view full sized, then right click save to your computer! Please don't share, instead direct others to my blog so they can get it themselves :)


My CT ladies have been busy, lol!! Here are some beautiful tuts, tags and snags that they've created with my kits. Thanks girls!!!
Party Rock here
(unfortunately someone reported their tut blog, even though it's been up forever, but you can still view the tag)

Do You Believe in Magic here
The Goodies Garden snags here

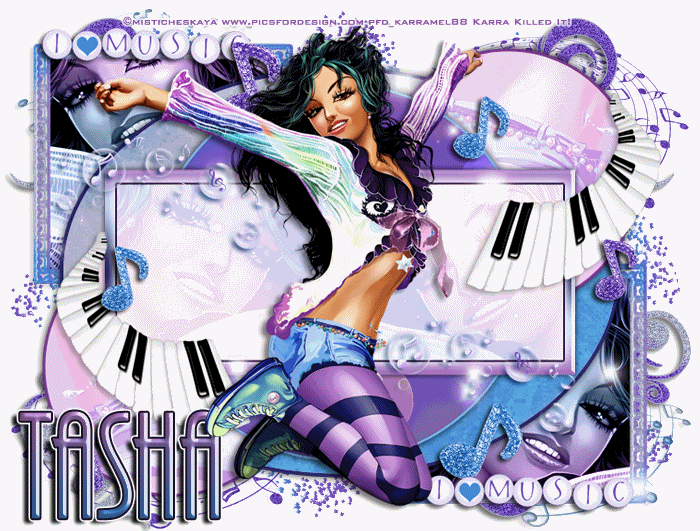
Music Moves Me here

2 Cute 2 Spook here
Music Moves Me here

Sunday, October 16, 2011

Supplies-
Kit- "EmolutionAddiction" by AmyMarie. Visit her blog here for info on how you can purchase this wonderful kit
Tube- I'm using one of the many amazing tubes by VeryMany available for purchase at PFD with a valid license
Mask- AR315_CMC_mask138 here
Font- Yippy Skippy Alt here
Plug Ins- penta.com>jeans, EC4>gradient glow
Here we go :)
Open a new canvas 650x650
c/p paper of choice onto canvas,I used paper 5
layers>new mask layer>from image
apply mask, merge group
center frame 1 over mask
activate your magic wand tool, click inside frame
selections>modify>expand by 5
add a new raster layer under frame
fill with paper,color or gradient of choice
c/p tube close up under frame
selections>invert
hit delete on keyboard and deselect
penta.com>jeans: amount 11, border width 9
change blend mode of tube to Luminance (L)
activate frame layer
EC4>gradient glow- add a fat, white glow
add tube of choice above frame
duplicate and move copy below frame
using eraser tool, get rid of the bottom of each tube
drop shadow the bottom tube layer
Decorate your tag with elements from the kit
I used:
sucker 1, 2, 3
buckle- duplicate, mirror
button 1, 2
glitter 1
rib 3, 4
vsr 1
nail polish 1
heel
Crop and resize your tag
add copyright and license info
add name and any text
drop shadow your elements
merge, save and enjoy!
Thank you for trying out my tut! If you have any questions, or would like to show me your results, feel free to email me- bananas_68@aol.com
Saturday, October 15, 2011
First, I'd like to say a big thank you to Heidi at Scottish Butterfly Creations for putting this blog train together, and inviting me to join :o) This blog train goes hand in hand with BCA awareness month, but looks more towards the good stuff...The Goodies those get as survivors, and The Goodies you appreciate more as a fighter. The first thing that I thought of with this, was a beautiful garden. So I hope you enjoy my contribution to this blog train, and please make sure to visit all the other spots and pick up their Goodies along the way :) Time zones may be different, so if you don't see anything yet on your travels, be sure to check back!!

TashasPlayGround--you are here
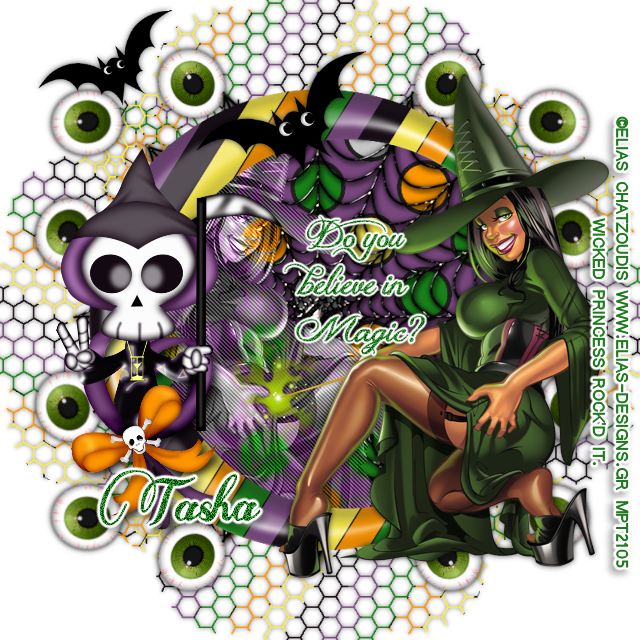
Thursday, October 13, 2011
I have some snaggables for you using the amazing work of Elias. His tubes are available for purchase at PTE with a valid license :) Just click on the tag to bring it full sized, then right-click save to your computer!!


Tuesday, October 11, 2011


Supplies-
Kit- I'm using "Best Friends Forever" by Butterfly Kisses Scraps. This cute kit can be purchased at SATC here.
Mask- AR315_Mask083 here
Font- The Buns, a FTU font here
Here we go :)
Open a new canvas 650x650
c/p paper14 onto canvas
layers>new mask layer>from image
apply mask, merge group
c/p frame 2 onto canvas
activate your magic wand tool, click inside frame
selections>modify>expand by 5
selections>invert
c/p paper09 as a new layer under frame
hit delete on your keyboard
deselect
Add elements from the kit to your tag
From bottom to top I used:
ribbon 2
beads
ribbon 1
hanging heart
flower 4
string button 1
flower 1
bff2
bff1
string button 2
crop and resize tag
add copyright and license info if you used a tube
add name and any text
merge, save, enjoy!
Thank you for trying my tut! If you have any questions, or would like to show me your results, please email me: bananas_68@yahoo.com
My new CT!! Thanks ladies, can't wait to start working with you!!I'd like to thank everyone for applying..I wish I could take all of you! I've saved the info of those who didn't get chosen this time in case I build my team larger, or if someone acts up, lmao :)
Sunday, October 9, 2011

Supplies-
Kit- "2 Cute 2 Spook" by me :) You can purchase this kit at any of the stores you see listed over on the left there
Tube- I'm using a fab tube by Elias which you can purchase at PTE with a valid license
Mask of choice
Font of choice
Here we go :)
Open a new canvas 650x650
Open paper 14 and c/p as a new layer on your canvas
layers>new mask layer>from image
apply mask, merge group
c/p frame onto canvas
activate your magic wand tool, click inside frame
selections>modify>expand by 5
c/p paper22 under frame layer
selections>invert, hit delete on paper layer
c/p close up of tube under frame layer
position, and hit delete on tube layer
deselect
on tube layer, change blend mode to Luminance(L)
Now decorate your tag with one of the many elements from the great kit :)
sharpen and add drop shadows as you go along
I used:
house 2
feather
brad
tombstone
skull 5
skeleton
pumpkin man
skull 3
Mr. Reaper
candy corn 2
monster
bat 2
crop and resize your tag
add copyright and license info
add name and any text
merge, save and enjoy!
Thank you for trying out my tut! If you have any questions or would like to show me your results, feel free to email me: bananas_68@yahoo.com
Friday, October 7, 2011
I'm very happy and thrilled to announce that you can now find my kits in 2 more stores- The Scrappin Divaz Designz and Scraps and the City!!!! Thank you to Jessye and Marie for having me on each of your teams :)
Thursday, October 6, 2011
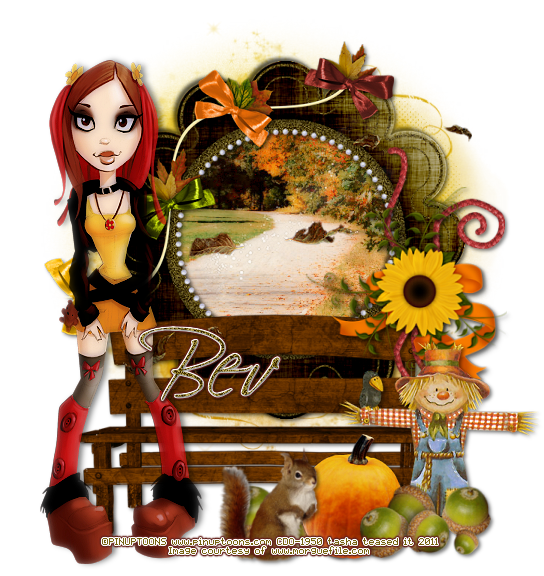
Supplies-
Kit- "Whispers of Autumn" a beautiful kit by HorsePlay's Pasture Designs. This kit is available at Lollipops n Gumdrops here
Tube- I'm using PinUpToons available for purchase at CDO with a valid license
Mask- ChiChi_Mask_6 here
Image of choice- I found mine at www.morguefile.com
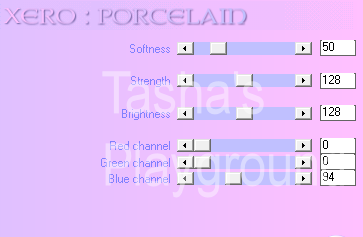
Plug Ins- Xero>Porcelain
Font of choice
Here we go :)
Open a new canvas 650x650
c/p element 18 onto the canvas
using your magic wand tool, click inside the frame
selections>modify>expand by 5
resize your picture of choice, or paper of choice and c/p as a new layer under the frame
selections>invert, hit delete on the keyboard. deselect.
c/p paper 7 as a new layer, move to the bottom
layers>new mask layer>from image
choose your mask, apply, merge group
use your raster deform tool to shape your mask around the frame
Add elements from the kit.
I used:
12
27
5
39-duplicate/mirror/resize
10
40
15
37
11
Add tube of choice
on your tube and image (if you used one) apply Xero>Porcelain
On the tube layer I also did
adjust>sharpen
Crop and resize your tag
add copyright and license info
add name and any text
drop shadow and sharpen your elements
merge, save, and enjoy!
Thank you for trying my tut! If you have any questions, or would like to show me your results, feel free to email me: bananas_68@yahoo.com

Yaay! I've received the Liebster Blog award from Country Bug and Scrappin Krazy Designs!! Thank you both for this award, and sorry it took me so long to get it post!
The aim of the award is to bring recognition to blogs with minimal followers.
Since I have accepted the award I must pass it on to at least 3 other blogs(but not more than 5), that have inspired me and I feel deserve a bit more attention.
The rules are to say thank you on my blog to the one who passed it on to me with a link to their blog.
Pick the blogs to pass the award on to,leave a note on their blog and then list them with links to their blogs.
The blogs I choose are:

I was given a "Your Blog Rocks!" award by Scrapz 'N' Stuff by Judith and Moody Designz!! Thanks so much for thinking of me for this award!!:o)
Here are the 5 blogs I would like to pass this award on to:
Subscribe to:
Posts
(Atom)
My Blinkies


I Get Creative For
