Search
Sign up for my Newsletter
Tasha's Playground Fan Page
Find me on Facebook
Followers
Thursday, September 27, 2012
Supplies:
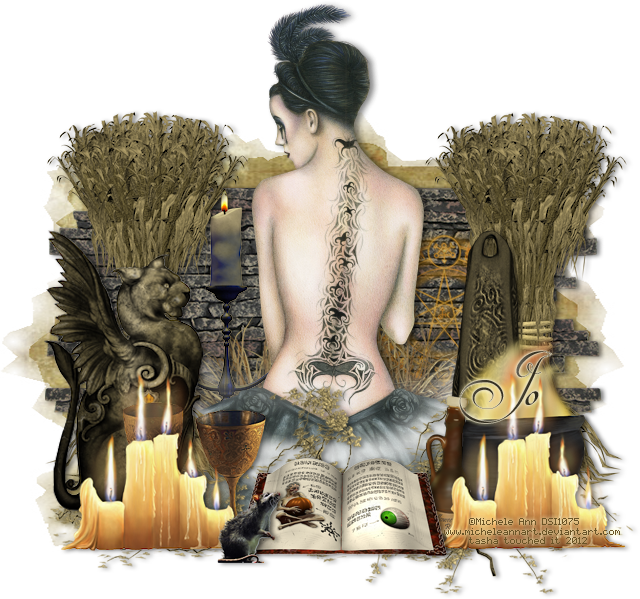
Kit- Dark Night of the Witch by A Taggers Scrap. Visit her blog here for where you can get this amazing kit!
Tube- I'm using the work of Michele Ann which you can purchase from DSI here
Mask- WSL_Mask128 here (link is on the left side of blog)
Font of choice
Photoshop CS5
I'm on a Mac, so when I use Command you may need to use Ctrl
Here we go :)
Open a new canvas 700x700
Place brickwall in center of canvas. Command+J to duplicate.
Edit>Transform>Flip Horizontal. Move over a bit so you have jagged brick on both sides
of the wall (refer to my tag for placement).
Open cornstalk and place to one side of wall. Duplicate and reposition to the other side.
From bottom to top add the following elements-
glyph
dead grass
candelabra
ghostly light
dead ivy
obelisk
tressym
cauldron 1
goblets
candles (duplicate, reposition)
bottle 1
book
rat
Open Layer Styles by double clicking the bottom most element (brick wall). Apply Drop Shadow
of choice. Now right-click and Copy Layer Style.
Right-click>Select Similar Layers. Right-click>Paste Layer Style.
Now you should have a drop shadow on all the elements :)
Place tube directly below the ghostly light layer. Duplicate.
On top tube layer change blend mode to Soft Light, Opacity 62%.
Add drop shadow to bottom tube layer.
Now let's get our mask ready! Open your mask on a new canvas.
Add a new layer above it, and flood fill with color of choice,
or use a paper from kit (I used paper 4).
Make sure your mask layer is activated and Command+A to Select All, Command+C to Copy.
Activate the paper layer, hit Q to turn on Quick Mask mode.
Command+V to paste the mask..it should now be tinted red.
Hit Q to turn off Quick Mask mode and there should now be marching ants on your canvas.
Hit the Add Layer Mask button at the bottom of the layer palette (rectangle with the circle in it)
Right click- convert to smart object
Right click- Rasterize layer
Drag completed mask to your tag canvas as the bottom layer
Resize it if needed.
I stretched it out using Command+T.
With your Rectangular Marquee Tool (m), draw out a selection around the entire
tag, just slight smaller than the canvas. Image>Crop.
This will get rid of any stray pixels or drop shadows you don't see.
Image>Trim>Top Left Pixel Corner to remove the excess space.
Add your license and copyright info to the tag.
Add name and any other text of choice.
Merge, save as PNG and enjoy :)
Thank you for trying my tut. If you have any questions or would like to show me your results, feel free to email me (bananas_68@yahoo.com) or post them on my Facebook :)
Labels:A Tagger's Scrap,Photoshop tut,PTU tut
Subscribe to:
Post Comments
(Atom)
Leave me some love
Labels
- A Space Between
- A Tagger's Scrap
- Abstract Creations
- Alena Lazareva
- Andreea Cernestean
- animated
- Announcement
- Autumn
- Autumn Blaze
- Autumn Breeze
- awards
- Birthstone Series
- blog train
- Cartoon Pink
- CDO
- Christmas
- Cluster Frame
- CT call
- Ct Tag
- Ct Team
- Cuddly Rigor Mortis
- dark/goth
- Designer Scraps
- Digital Chaos
- Dirk Richter
- DSI
- Elias Chatzoudis
- Enys Guerrero
- FB Timeline Cover
- Fluff
- Forum Set
- FourXDesigns
- freebie
- FTU CU
- FTU kit
- FTU tut
- Full Size Kit
- Gimptastic Scraps
- Gorjuss
- Halloween
- IB kit
- Keith Garvey
- KiwiFireStorm
- Lollipops N Gumdrops
- Molly Harrison
- New Years
- No Scrap
- PFD
- Photoshop tut
- Pimpin PSPers
- Previously Released
- PTE
- PTU CU
- PTU kit
- PTU tut
- quick page
- Rebecca Sinz
- Rosanna Castellino
- sale
- Sarah's Tags N Things
- Scrap-U-Nique
- Shawli
- Sheena Pike
- snaggable
- Soxsational Scraps
- Spazzd Art
- spring
- St. Patrick's Day
- Standalone kits
- summer
- Summer Haze
- tag show off
- tags
- tags with my kits
- tags with my templates
- Tasha's CT
- template
- Thanksgiving
- TPP
- tut result
- Twilight Scraps
- Valentine
- Whispered Bliss
- Wicked Princess Scraps
- Winter
- wordart
Blog Archive
-
▼
2012
(213)
-
▼
September
(16)
- Choo-choo!!! Gothic Inspirations Blog Train!!!
- Bewitched- PTU
- Fairy Whispers Extras!!!
- Dark Night of the Witch- PTU
- Dead of Night- FTU
- Autumn Leaves- PTU
- Booga Booga- PTU
- Spooked- New Kit!!
- Check Your ChiChis- FTU Collab
- Fall Days- PTU
- Spellbound- New Kit!!
- Farewell Summer- PTU
- I'm Not Emo- FTU Mini Kit
- Autumn Fox- FTU
- Fall In Color- FTU
- Choo-Choo!!! New Blog Train Freebie!
-
▼
September
(16)


0 comments:
Post a Comment