Search
Sign up for my Newsletter
Tasha's Playground Fan Page
Find me on Facebook
Followers
Monday, August 29, 2011
Supplies:
Tube- You'll want a tube that comes with a close up. I used Alicia Mujica available at PTE here. You must request a special license to use the same tube.
Texture- texture 17 from pack 2 here
Plug Ins- Mura Meister>copies, DSB Flux>Bright Noise
optional- penta.com>VTR, L en K>Mayra
Animation Shop
Here we go :)
Open a new canvas, I like my banners 600x200
Pick 2 colors from your tube and create a foreground/background gradient
angle 210, repeat 1, linear
Duplicate and apply L en K>Myra:
0, 109, 149, 24
change blend mode to Screen, opacity 75
Activate your selection tool, rectangle
select half the banner and delete the side that will have your bars
deselect
Add texture of choice above your half layer
change blend mode to overlay, opacity 52
Activate your preset shapes rectangle tool
foreground null, background color doesn't matter
you're going to delete this layer anyway
Draw a rectangle the length of your banner a little left of center
Mura Meisters>copies:
If you are doing your bars on the other side, then just change the Shift X to 100
Make sure your bar layer is activated
selections>select all>float>defloat
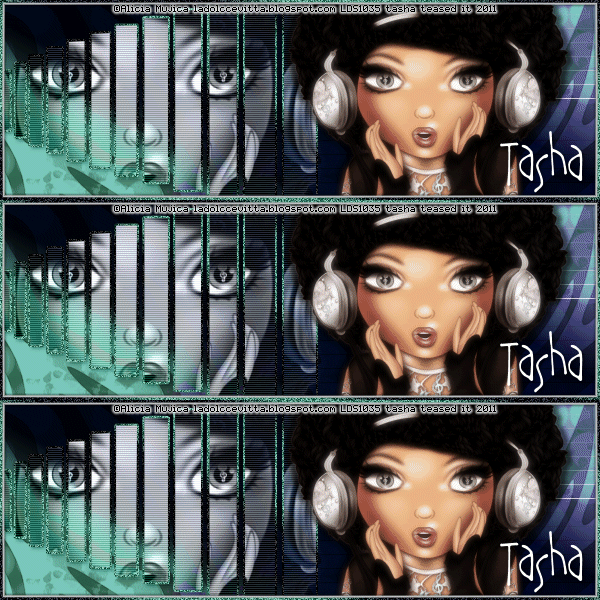
c/p close up of tube onto canvas, and position over bars
selections>invert
delete, deselect
With close up tube layer activated,
change blend mode to Luminance (L) or whatever you like best :)
Apply penta.com>VTR, default settings
Highlight bars layer again
Selections>modify>select selection borders
Both sides, border width 2, anti-alias checked
add a new raster layer, move above tube close up
flood fill with same gradient as before, but change repeats to 3
deselect
add a drop shadow to the close up tube bars (2, 2, 65, 7)
Add main tube of choice
duplicate
adjust>blur>gaussian blur 3
blend mode screen, opacity 68
drop shadow bottom tube layer
crop your banner
Highlight your bottom layer
selections>select all>float>defloat
selections>modify>select selection borders
Inside, width 4, anti-alias checked
add new layer, move to top
flood fill with color of choice (I chose a lighter color for contrast)
Add a slight drop shadow (1, 1, 50, 2 then -1, -1, 50, 2)
Now repeat the steps above, but change the border width to 2
flood fill that new layer with the same gradient as before
move to the top
Add your copy right and license info
add name and any text
To animate:
Duplicate your top border layer and the bars border layer so you have 3 of each
I renamed each of those layers 1, 2 and 3 so I wouldn't get confused ;p
Close out layers 2&3
On both of the 1 layers, apply DSB>Flux, 65, Mix
copy merged
Over to AS and paste as a new animation
Back to PSP
close out both of the 1 layers, open the 2 layers
Re-apply DSB>Flux, but hit Mix again before applying
Back to AS
Paste after current layer
Back to PSP
close out both of the 2 layers, open the 3 layers
Re-apply DSB>Flux, but hit Mix again before applying
back to AS
Paste after current layer
View animation
if you're happy, save as a GIF file :)
Thank you for trying my tutorial. If you have any questions or would like to show me your results, please email me: bananas_68@yahoo.com
Subscribe to:
Post Comments
(Atom)
Leave me some love
Labels
- A Space Between
- A Tagger's Scrap
- Abstract Creations
- Alena Lazareva
- Andreea Cernestean
- animated
- Announcement
- Autumn
- Autumn Blaze
- Autumn Breeze
- awards
- Birthstone Series
- blog train
- Cartoon Pink
- CDO
- Christmas
- Cluster Frame
- CT call
- Ct Tag
- Ct Team
- Cuddly Rigor Mortis
- dark/goth
- Designer Scraps
- Digital Chaos
- Dirk Richter
- DSI
- Elias Chatzoudis
- Enys Guerrero
- FB Timeline Cover
- Fluff
- Forum Set
- FourXDesigns
- freebie
- FTU CU
- FTU kit
- FTU tut
- Full Size Kit
- Gimptastic Scraps
- Gorjuss
- Halloween
- IB kit
- Keith Garvey
- KiwiFireStorm
- Lollipops N Gumdrops
- Molly Harrison
- New Years
- No Scrap
- PFD
- Photoshop tut
- Pimpin PSPers
- Previously Released
- PTE
- PTU CU
- PTU kit
- PTU tut
- quick page
- Rebecca Sinz
- Rosanna Castellino
- sale
- Sarah's Tags N Things
- Scrap-U-Nique
- Shawli
- Sheena Pike
- snaggable
- Soxsational Scraps
- Spazzd Art
- spring
- St. Patrick's Day
- Standalone kits
- summer
- Summer Haze
- tag show off
- tags
- tags with my kits
- tags with my templates
- Tasha's CT
- template
- Thanksgiving
- TPP
- tut result
- Twilight Scraps
- Valentine
- Whispered Bliss
- Wicked Princess Scraps
- Winter
- wordart
Blog Archive
-
▼
2011
(230)
-
▼
August
(23)
- Desperation- PTU
- Feel the Beat- No Scraps
- Summer Garden- PTU
- Black Hearted- PTU
- CT tag show off
- Golden Mermaid- FTU
- Midnight Escape- PTU
- If I Die Young- PTU
- Hot and Dangerous- PTU
- Oh, Ryan!- PTU
- Girls Rock- PTU
- Best Blog Award
- FTU Kit- This N That
- A Little Birdie Told Me- FTU
- Punk'd- FTU
- Pirate B!tch- PTU
- Alice- PTU
- CT tag show off/snags
- Sex On The Beach - FTU KIT
- Uncolored Elegance- PTU
- Casino Night- PTU
- Tag show off
- Tag show off
-
▼
August
(23)


0 comments:
Post a Comment