Search
Sign up for my Newsletter
Tasha's Playground Fan Page
Find me on Facebook
Followers
Tuesday, November 20, 2012
Supplies-
Kit- Forest Keepers, a gorgeous kit by Gimptastic Scraps here
Tube- Arthur Crowe which you can find here. You must purchase this tube and have a valid license to use it.
Font- The Daily Bread
Photoshop CS5
I'm on a Mac, so when I use Command you may need to use Ctrl
Here we go :)
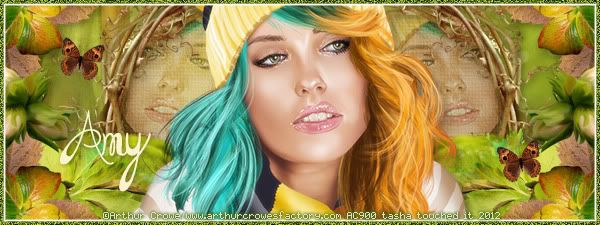
Open a new canvas 600x225.
Place Paper 2 as the bottom layer and position how you like.
Create a corner border with some of the elements:
Place Grass above paper and position towards the left corner.
Place Branch 4 in bottom left corner.
Position Leaf 2 in the bottom left corner. Command+J to duplicate.
Edit>Transform>Flip Vertical. Place copy in upper left corner.
Place Leaf 3 centered above Leaf 2. Duplicate and flip as above.
Place Flower 4 in the middle of the border.
Close out the background paper layer by clicking the eye next to it.
Merge visible your other elements.
Add a drop shadow of choice. Duplicate border layer.
Edit>Transform>Flip Horizontal. Reposition to right corner.
Make background visible again.
Add Frame 5 above paper, position to the left. Duplicate and flip then place
copy to the right of canvas. Merge 2 frame layers together.
Place Paper 5 below frames. Using Magic Wand Tool (w), click inside each frame.
You may need to click around inbetween a few branches.
Select>Modify>Expand by 2. Select>Inverse. Hit Delete on paper layer. Deselect.
Add tube close ups below the frame layer. Right click and Create Clipping Mask to clip the
tubes to your paper. Change blend mode to Soft Light, Opacity 45%.
Duplicate. Change blend mode to Screen, Opacity 55%.
Add drop shadow of choice to frame layer.
Add main tube to center of canvas as top layer. Duplicate.
Filter>Blur>Gaussian blur 2px. Blend mode Screen, Opacity 60%.
Drop shadow bottom tube layer.
Create a new layer as the top layer.
Select>All. Select>Border 4px. Flood fill with color #64770b.
Duplicate layer. On top- Filter>Noise>Add Noise 40%, Uniform.
On bottom layer, add a 2px white stroke, outside.
Decorate with any remaining elements from the kit. I added a couple of butterflies.
Add artist copyright info and your license for the tube.
Add name and any additional text of choice.
Merge, save, enjoy :)
Thank you for trying my tut. If you have any questions or would like to show me your results, feel free to email me or find me on facebook!
Subscribe to:
Post Comments
(Atom)
Leave me some love
Labels
- A Space Between
- A Tagger's Scrap
- Abstract Creations
- Alena Lazareva
- Andreea Cernestean
- animated
- Announcement
- Autumn
- Autumn Blaze
- Autumn Breeze
- awards
- Birthstone Series
- blog train
- Cartoon Pink
- CDO
- Christmas
- Cluster Frame
- CT call
- Ct Tag
- Ct Team
- Cuddly Rigor Mortis
- dark/goth
- Designer Scraps
- Digital Chaos
- Dirk Richter
- DSI
- Elias Chatzoudis
- Enys Guerrero
- FB Timeline Cover
- Fluff
- Forum Set
- FourXDesigns
- freebie
- FTU CU
- FTU kit
- FTU tut
- Full Size Kit
- Gimptastic Scraps
- Gorjuss
- Halloween
- IB kit
- Keith Garvey
- KiwiFireStorm
- Lollipops N Gumdrops
- Molly Harrison
- New Years
- No Scrap
- PFD
- Photoshop tut
- Pimpin PSPers
- Previously Released
- PTE
- PTU CU
- PTU kit
- PTU tut
- quick page
- Rebecca Sinz
- Rosanna Castellino
- sale
- Sarah's Tags N Things
- Scrap-U-Nique
- Shawli
- Sheena Pike
- snaggable
- Soxsational Scraps
- Spazzd Art
- spring
- St. Patrick's Day
- Standalone kits
- summer
- Summer Haze
- tag show off
- tags
- tags with my kits
- tags with my templates
- Tasha's CT
- template
- Thanksgiving
- TPP
- tut result
- Twilight Scraps
- Valentine
- Whispered Bliss
- Wicked Princess Scraps
- Winter
- wordart
Blog Archive
-
▼
2012
(213)
-
▼
November
(14)
- A Very Merry Winter- New Kit!
- PFD CT snags- Zlata
- CT tag show off!
- Forest Keeper- FTU
- Violet Winter- New kit!
- PFD CT tag show off
- Sale! Sale! Sale!
- Winter Diva Collab- FTU
- Winter Wonderland- New Kit!!
- Tag show off
- Turkey Day Protest- FTU
- Samhain Night- PTU
- Grave Yard Groupie- PTU
- 2 New CU Paper Templates!!
-
▼
November
(14)


0 comments:
Post a Comment