Find my kits here

Tasha's Playground Fan Page
Find me on Facebook
My Personal CT


Thursday, March 1, 2012
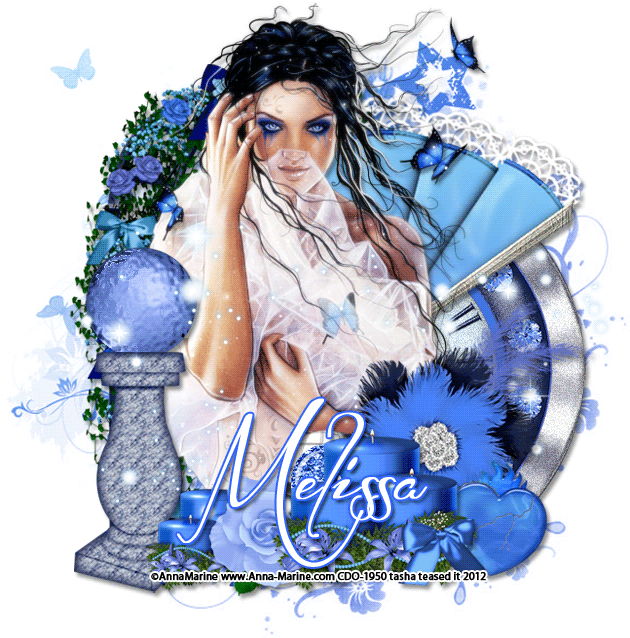
Supplies-
Kit- Midnight Blues by Rabid Designz. This kit is available at Twilight Scraps here
Tube- Anna Marine available for purchase from CDO with a valid license
Mask- VixMask 363 here
Font of choice
Photoshop CS5 or program of choice
(I use a Mac, so when I say Command, you may need to hit Ctrl)
Command+N to open a new image 650x650 with a white background
Open your mask, drag paper 1 to that canvas
Make sure your mask layer is activated and Command+A to Select All
Command+C to copy
Then activate your paper layer, hit Q to enter Quick Mask mode
Command+V to paste mask on paper layer-it should now be tinted red
hit Q on the paper layer to exit Quick Mask mode.
You should now have marching ants outlining where your mask is laying on the paper,
reposition or transform as needed
Click Add Layer Mask at the bottom of the layer palette
-it's the button that looks like a circle inside a rectangle
Now Right click and Convert to Smart Object
Then right click again and Rasterize Layer
Drag your mask to your tag canvas
Open your tube of choice and position in the center of the mask
I like to add a nice glow, so I duplicated the tube
On top layer, Filers>Blur>Gaussian blur 2
Blend Mode Screen, Opacity 55%
Drop Shadow the bottom tube layer
Build around your tube with elements from the kit.
Drop shadow (Layer Style> drop shadow) and resize
(Command+T, click chain link on tool bar between Width and Height) as you go along
From bottom to top I used:
3
12
24
37
18
11
35
26
34
8
18
Now crop your tag- Image>Trim>Top Left Pixel Corner
Resize your tag- Image>Image Size- make sure Constrain Proportions is checked
Add your license and artist copyright info
Add name and any additional text
If you aren't going to animate, delete white background, save as PNG :)
To animate:
Activate Element 37 in your layer palette
Command+J to duplicate 2x for a total of 3 layers
Using your magic wand tool, click on the orb until you've selected most of it
On the first layer apply
Filter>Distort>Glass with these settings-

Repeat with the 2 remaining orbs, just change the Scaling slider by 10 each time.
Now Duplicate Element 12 for a total of 3 layers
click on the silver frame with your magic wand
Filter>Noise>Add Noise- Amount 10%, Uniform Distribution
Command+F on the remaining 2 layers
Now hide the first 2 layers of Element 12 and Element 37
Window>Animation- Your first frame should appear in the animation window
Duplicate the frame, Unhide the 2nd layer of both elements, hide the 1st
Duplicate the frame, Unhide the 3rd layer of both elements, hide the 2nd
Change your time delay to your preference..I used No Delay
File-Save for Web & Devices, save as GIF, enjoy :)
Thank you for trying my tut. If you have any questions or would like to show me your results, please email me- bananas_68@yahoo.com
Subscribe to:
Post Comments
(Atom)
My Blinkies


I Get Creative For

0 comments:
Post a Comment