Find my kits here

Tasha's Playground Fan Page
Find me on Facebook
My Personal CT


Tuesday, April 17, 2012
Supplies-
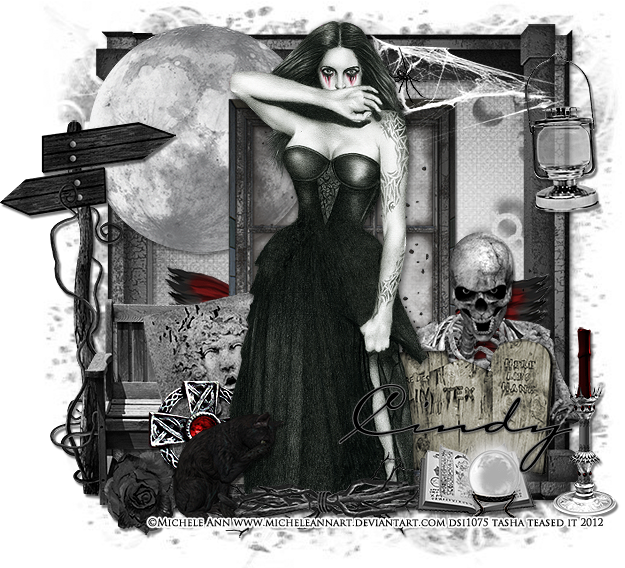
Kit- "Creeped" by ChiChi Designz. You can find this kit at Lollipops N Gumdrops here. It has over 100 elements and 20 papers and is on sale right now :)
Tube- I'm using the art of Michele Ann, which you can purchase at DSI with a valid license.
Mask of choice (sorry, forgot which one I used)
Font of choice
Photoshop CS5 or program of choice
I use a Mac, so when I use Command, you may need to use Ctrl.
Here we go :)
Open a new canvas 750x750, transparent background.
Center Frame on canvas. Add paper of choice behind frame. I used Paper14.
Activate your Magic Wand tool (w) and click inside frame.
Select>Modify>Expand by 5 px. Select>Inverse.
Select paper layer and hit delete on your keyboard. Deselect.
From bottom to top, add the following elements:
Moon- upper left of frame
Wings- bottom of frame
Rubble- Center of frame
Window- Directly above rubble
Webspidr- upper right corner of frame
Lantern- on upper right corner
Signs- left side of tag
Bench- bottom left of tag
Stone- laying in front of bench
Jewel- left of stone
Skeleton- Bottom right of frame
Tombstone- directly in front of skeleton
Blackrose- bottom left of bench
Candle- right of tag
*tube*
Branches- in front of tube
Spellbook- right of tube
Crystal ball- in front of spell book
Cat- left of tube
Now place your tube of choice where indicated above.
Duplicate and on top copy-Blend Mode Hard Light, Opacity 30%
Add drop shadow to bottom tube layer.
Add drop shadows to elements as well.
Now let's get our mask ready! Open your mask on a new canvas.
Add a new layer above it, and flood fill with color of choice,
or use a paper from kit.
Make sure your mask layer is activated and Command+A to Select All, Command+C to Copy.
Activate the paper layer, hit Q to turn on Quick Mask mode.
Command+V to paste the mask..it should now be tinted red.
Hit Q to turn off Quick Mask mode and there should now be marching ants on your canvas.
Hit the Add Layer Mask button at the bottom of the layer palette (rectangle with the circle in it)
Right click- convert to smart object
Right click- Rasterize layer
Drag completed mask to your tag canvas as the bottom layer
Resize it if needed.
Crop, trim and resize your tag.
Add copyright and license info.
Add name and any text.
Merge, save as PNG and enjoy :)
Subscribe to:
Post Comments
(Atom)
My Blinkies


I Get Creative For

0 comments:
Post a Comment